

Sunday, April 11, 2010
Cisco, enable SSH server
This is with normal "Username/Password" authentication. Apparently IOS 15.0M and up is supporting public/private key authentication...
Router# show ip ssh
Router(config)#hostname myhostname
myhostname(config)#ip domain-name mydomain
myhostname(config)#crypto key generate rsa modulus 2048
myhostname(config)#ip ssh time-out 120
myhostname(config)# ip ssh authetication-retries 3
myhostname(config)# ip ssh port 1234
myhostname(config)#ip ssh version 2
myhostname(config)#username myusername secret mypassword
myhostname(config)#line vty 0 4
myhostname(config)# transport input ssh
myhostname(config-line)#login local


Saturday, April 10, 2010
Handy GSM codes
@ = Send/OK button on your mobile phone
TO DIVERT CALLS
DIVERT ALL CALLS
CALL NOT ANSWERED
DIVERT FOR ALL CALLS
DIVERTS WHEN PHONE IS UNREACHABLE
DIVERTS WHEN PHONE IS BUSY
BARRING ALL OUTGOING CALLS
BARRING ALL CALLS
BARRING ALL OUTGOING INTERNATIONAL CALLS
BARRING ALL OUTGOING CALLS
BARRING ALL INCOMING CALLS
BARRING ALL INCOMING CALLS IF ROAMING
CALL WAITING
RINGS UNTIL ANSWERED BY YOUR VOICEMAIL
If your mobile's voicemail number is, for example:
+27-79-131-123-4567
....and you want your phone to divert to your voicemail after say 20 seconds, then type:
**61*+27791311234567**20#
The time can be up to 30 seconds (network default)
N =Ring Time (up to 30 seconds)
SEND/PREVENT YOUR PHONE NUMBER BEING SENT TO ANOTHER PHONE NUMBER
SEND/PREVENT INCOMING PHONE NUMBERS BEING SEEN ON YOUR PHONE
CHANGING PIN CODES
UNBLOCKING PHONE USING A PUK NUMBER
DISPLAY IMEI NUMBER
Reference: http://www.cellular.co.za/gsm_hash_code.htm
TO DIVERT CALLS
| ACTION | CODE |
| Deactivate call diverts | ##002#@ |
| Deactivate all conditional diverts | ##004#@ |
| Activate all conditional diverts | **004*DestinationNumber#@ |
DIVERT ALL CALLS
| Action | Hash Codes |
| Deactivate automatically divert all calls to Destination Number | ##21#@ |
| Deactivate automatically divert all calls to Destination Number | #21#@ |
| Set and Activate divert all calls to | **21*DestinationNumber#@ |
| Activate divert all calls | *21#@ |
| Status of automatically divert all calls to Destination Number | *#21#@ |
CALL NOT ANSWERED
| ACTION | CODE |
| Activate and Set call diversion when not answered | **61*DestinationNumber#@ |
| Deactivate and turn off call divert when not answered | ##61# |
| Deactivate call divert | #61#@ |
| Activate call diversion | *61#@ |
DIVERT FOR ALL CALLS
| ACTION | CODE |
| Set and Activate divert all calls to | **21*DestinationNumber#@ |
| Activate divert all calls | *21#@ |
| Deactivate divert all calls | #21#@ |
| Status of automatically divert all calls to Destination Number | *#21#@ |
DIVERTS WHEN PHONE IS UNREACHABLE
| ACTION | CODE |
| Activate call divert when not reachable | **62*DestinationNumber#@ |
| Activate call divert | *62#@ |
| Deactivate and turn off call divert if unreachable | ##62#@ |
| Deactivate call divert | #62#@ |
| Status of call divert if not reachable | *#62#@ |
DIVERTS WHEN PHONE IS BUSY
| ACTION | CODE |
| Activate call divert when busy (engaged on another call) | **67*DestinationNumber#@ |
| Activate call divert when busy | *67#@ |
| Deactivate call divert when busy | ##67#@ |
| Deactivate call divert when busy | #67#@ |
| Status of call divert when busy | *#67#@ |
BARRING ALL OUTGOING CALLS
| ACTION | CODE |
| Change password for call barring | **03*330*oldPW*newPW*newPW#@ |
| Activate barring for all outgoing calls | **33*PW#@ |
| Deactivate barring for all out going calls | #33*PW#@ |
| Status barring for all out going calls | *#33#@ |
BARRING ALL CALLS
| ACTION | CODE |
| Activate barring for all calls | **330*PW#@ |
| Deactivate barring for all calls | #330*PW#@ |
| Status baring for all calls | *#330*PW#@ |
BARRING ALL OUTGOING INTERNATIONAL CALLS
| ACTION | CODE |
| Activate barring for all outgoing international calls | **331*PW#@ |
| Deactivate barring for all outgoing international calls | #331*PW#@ |
| Status barring all outgoing international calls | *#331#@ |
BARRING ALL OUTGOING CALLS
| ACTION | CODE |
| Activate barring all outgoing calls | **333*PW#@ |
| Deactivate barring all outgoing calls | #333*PW#@ |
| Status barring all outgoing calls | *#333#@ |
BARRING ALL INCOMING CALLS
| ACTION | CODE |
| Activate barring all incoming calls | **35*PW#@ or **353*PW#@ |
| Deactivate barring all incoming calls | #35*PW#@ or **353*PW#@ |
| Status barring all incoming calls | *#35#@ or *#353#@ |
BARRING ALL INCOMING CALLS IF ROAMING
| ACTION | CODE |
| Activate barring all incoming calls if abroad | **351*PW#@ |
| Deactivate barring all incoming calls if abroad | #351*PW#@ |
| Status barring all incoming calls if abroad | *#351#@ |
CALL WAITING
| ACTION | CODE |
| Activate call waiting | *43#@ |
| Deactivate call waiting | #43##@ |
| Status call waiting | *#43#@ |
RINGS UNTIL ANSWERED BY YOUR VOICEMAIL
If your mobile's voicemail number is, for example:
+27-79-131-123-4567
....and you want your phone to divert to your voicemail after say 20 seconds, then type:
**61*+27791311234567**20#
The time can be up to 30 seconds (network default)
| ACTION | CODE |
| Set number of rings | **61*YourVoiceMailNumber**N#@ |
| Cancel previous Setting entered | ##61#@ |
SEND/PREVENT YOUR PHONE NUMBER BEING SENT TO ANOTHER PHONE NUMBER
| ACTION | CODE |
| Disable your phone number being sent | #30#DestinationNumber@ |
| Enable your phone number being sent | *30#DestinationNumner@ |
| Status of your phone number being sent | *#30# |
SEND/PREVENT INCOMING PHONE NUMBERS BEING SEEN ON YOUR PHONE
| ACTION | CODE |
| Disable incoming number being shown on your phone | *77# |
| Enable incoming number being shown on your phone | #77#@ |
| Status of whether calling parties number is shown on your phone | *#77#@ |
CHANGING PIN CODES
| ACTION | CODE |
| Change PIN 1 | **04*PINOLD*PINNEW*NEWPIN1#@ |
UNBLOCKING PHONE USING A PUK NUMBER
| ACTION | CODE |
| Unblock PIN 1 | **05*PUK*newPIN1*newPIN1#@ |
DISPLAY IMEI NUMBER
| Display IMEI Number | *#06# |
Reference: http://www.cellular.co.za/gsm_hash_code.htm
Putty, SSH, Public/Private key authentication, passwordless
Go to Start --> All Programs --> Putty --> PuTTYgen
Set type of key to generate SSH-2 RSA and number of bits in a generated key to 2048. Click the "Generate" button and move the mouse to generate your unique key.
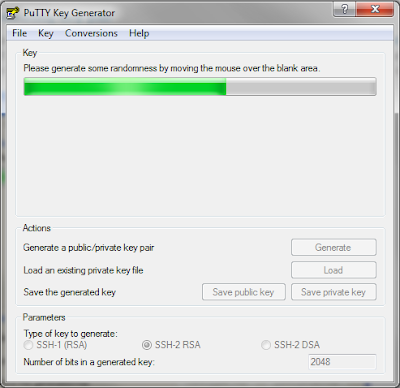
When that's finished, Click "Save public key" to save your public key to a file, e.g. mykey.pub. Click "Save private key" and save it as e.g. mykey.pkk. SSH to your server with e.g. myuser, user account.
Go to Start --> All Programs --> Putty --> PuTTY
Set up your Session:
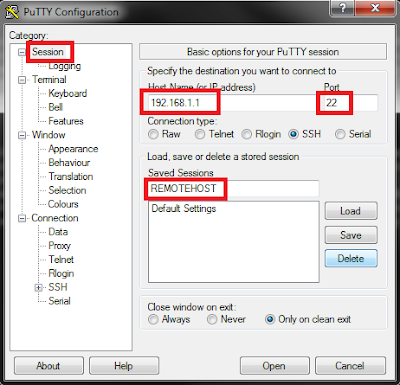
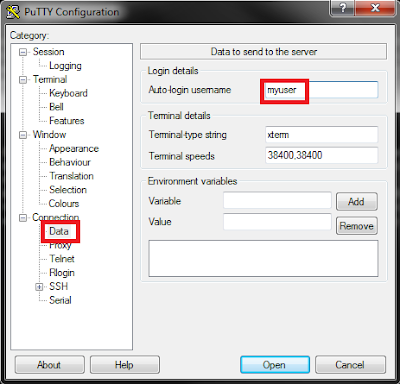
Under Connection --> Data
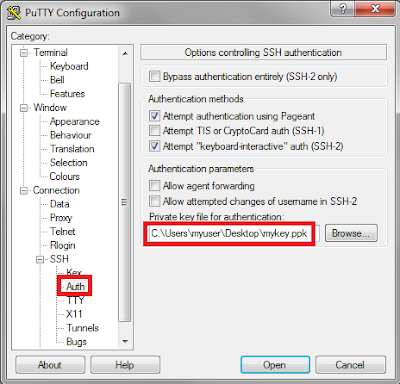
Under Connection --> SSH --> Auth
Click "Browse" and browse for the mykey.pkk file that you saved earlier.
Set type of key to generate SSH-2 RSA and number of bits in a generated key to 2048. Click the "Generate" button and move the mouse to generate your unique key.

When that's finished, Click "Save public key" to save your public key to a file, e.g. mykey.pub. Click "Save private key" and save it as e.g. mykey.pkk. SSH to your server with e.g. myuser, user account.
mkdir /home/myuser/.ssh
echo "ssh-rsa AAAAAWNzaC1KEcNZLmBl1poSrNCQ9o5rv5ts+txlu8eFvwk== rsa-key-20100410" >> /home/myuser/.ssh/authorized_keys
Go to Start --> All Programs --> Putty --> PuTTY
Set up your Session:

Under Connection --> Data

Under Connection --> SSH --> Auth
Click "Browse" and browse for the mykey.pkk file that you saved earlier.

Go back to Session and click "Save". You will now have a new session entry, REMOTEHOST, that you can double-click and PuTTY will automatically login as the myuser username to your REMOTEHOST box.
Public/Private key authentication with SSH, passwordless
On the local server, logged in as, eg. myuser:
Change to myuser's home directory.
On the remote server, you wish to log into:
Change to myuser's home directory.
mkdir /home/myuser/.ssh
cd /home/myuser/.ssh
ssh-keygen -t rsascp /home/myuser/.ssh/id_rsa.pub myuser@remote-server:/home/myuser/id_rsa.local-server.pubOn the remote server, you wish to log into:
mkdir /home/myuser/.ssh
chmod 700 /home/myuser/.ssh
cat /home/myuser/id_rsa.local-server.pub >> /home/myuser/.ssh/authorized_keys
chmod 644 /home/myuser/.ssh/authorized_keysThursday, April 8, 2010
SNMP on Cisco routers
snmp-server community mysecret ro 60
access-list 60 permit 192.168.1.1 255.255.255.0snmp-server host 192.168.1.1 mysecretDHCP server on Cisco routers
Router(config)#ip dhcp pool <any-dhcp-pool-name>
Router(dhcp-config)#network <my-network-ip> <my-network-subnetmask>
Router(dhcp-config)#dns-server <my-dns-server-ip>
Router(dhcp-config)#default-router <my-gateway-ip>
Router(dhcp-config)#domain-name <my-domain-name>
Router(dhcp-config)#lease DAYS HOURS MINUTES
Router(config)#ip dhcp excluded-address <ip-address-to-exclude-from-pool>
Router(config)#service dhcpRouter#show ip dhcp bindingRouter#show ip dhcp server statisticsRouter(config)#ip dhcp excluded-address <start-ip-to-exclude> <end-ip-to-exclude>Router(dhcp-config)#lease infiniteTuesday, April 6, 2010
Routing between VLANs, Cisco router and 3COM 4500 switch
Using a Cisco router to do the routing and a 3COM 4500 Superstack III switch for the VLANs, 802.1Q trunk setup. I'm not going to use port 1 on the switch, as this belongs to the native VLAN1. Also remember that all the other ports on the switch, not assigned to their own VLANs, will also by default belong to VLAN1. In other words, all devices plugged into any of the VLAN1 ports, will be able to see each other by default!

Setup on the Cisco router:
Setup on the 3COM 4500 Superstack III switch:

Setup on the Cisco router:
interface fa0/1
description Trunk to 3COM Switch
no ip address
no shut

interface FastEthernet0/1.13
description Finance to switch port 13
encapsulation dot1Q 13
ip address 192.168.1.1 255.255.255.0

interface FastEthernet0/1.14
description Legal to switch port 14
encapsulation dot1Q 14
ip address 192.168.2.1 255.255.255.0

interface FastEthernet0/1.15
description HR to switch port 15
encapsulation dot1Q 15
ip address 192.168.3.1 255.255.255.0

interface FastEthernet0/1.16
description QC to switch port 16
encapsulation dot1Q 16
ip address 192.168.4.1 255.255.255.0

interface FastEthernet0/1.17
description Management to switch port 17
encapsulation dot1Q 17
ip address 192.168.5.1 255.255.255.0Setup on the 3COM 4500 Superstack III switch:
Select menu option (bridge/vlan): create
Select VLAN ID (2-4094)[3]: 2
Enter VLAN Name [VLAN 2]: Trunk

Select menu option (bridge/vlan): create
Select VLAN ID (2-4094)[3]: 13
Enter VLAN Name [VLAN 13]: Finance

Select menu option (bridge/vlan): create
Select VLAN ID (2-4094)[3]: 14
Enter VLAN Name [VLAN 14]: Legal

Select menu option (bridge/vlan): create
Select VLAN ID (2-4094)[3]: 15
Enter VLAN Name [VLAN 15]: HR

Select menu option (bridge/vlan): create
Select VLAN ID (2-4094)[3]: 16
Enter VLAN Name [VLAN 16]: QC

Select menu option (bridge/vlan): create
Select VLAN ID (2-4094)[3]: 17
Enter VLAN Name [VLAN 17]: Management

Select menu option (bridge/vlan/modify): add
Select VLAN ID (1-2,116,120)[1]: 13
Select bridge ports (AL1-AL4,unit:port...,?): 1:13
Enter tag type (untagged, tagged): untagged

Select menu option (bridge/vlan/modify): add
Select VLAN ID (1-2,116,120)[1]: 14
Select bridge ports (AL1-AL4,unit:port...,?): 1:14
Enter tag type (untagged, tagged): untagged

Select menu option (bridge/vlan/modify): add
Select VLAN ID (1-2,116,120)[1]: 15
Select bridge ports (AL1-AL4,unit:port...,?): 1:15
Enter tag type (untagged, tagged): untagged

Select menu option (bridge/vlan/modify): add
Select VLAN ID (1-2,116,120)[1]: 16
Select bridge ports (AL1-AL4,unit:port...,?): 1:16
Enter tag type (untagged, tagged): untagged

Select menu option (bridge/vlan/modify): add
Select VLAN ID (1-2,116,120)[1]: 17
Select bridge ports (AL1-AL4,unit:port...,?): 1:17
Enter tag type (untagged, tagged): untagged

Select menu option (bridge/vlan/modify): add
Select VLAN ID (1-2,116,120)[1]: 13-17
Select bridge ports (AL1-AL4,unit:port...,?): 1:2
Enter tag type (untagged, tagged): taggedMonday, April 5, 2010
Ubuntu, LAMP, SSL, CGI and password protection
I'll setup a minimal install of Ubuntu 9.10, Apache webserver, MySQL database and make it PHP compatible. I'll be using a self signed SSL certificate, create a Virtual Host and password protect the space. I'll also make the Virual Host ready to run CGI scripts.
1. Install LAMP environment:
Login as "root"
change memory_limit = 16M to memory_limit = 32M
From another PC type http://yourserverip/info.php in your browser and you should see some nice info about your PHP installation. After we've seen this page, we know PHP works and "info.php" can be removed:
#NameVirtualHost *:80
#Listen 80
2. Configure a SSL and CGI ready Virtual Host:
Change ServerAdmin webmaster@localhost to ServerAdmin youremail@address
Add ServerName www.mydomain.com:443 under ServerAdmin line
Change DocumentRoot /var/www to DocumentRoot /var/www/www.mydomain.com/public_html
Change AllowOverride None to AllowOverride AuthConfig
Change <Directory /var/www/> to <Directory /var/www/www.mydomain.com/>
Change AllowOverride None to AllowOverride AuthConfig
Change ScriptAlias to ScriptAlias /cgi-bin/ /var/www/www.mydomain.com/cgi-bin/
Change <Directory "/usr/lib/cgi-bin"> to <Directory "/var/www/www.mydomain.com/cgi-bin">
Change ErrorLog /var/www/www.mydomain.com/logs/error.log
Change CustomLog to CustomLog /var/www/www.mydomain.com/logs/ssl_access.log combined
Change, under </FilesMatch>, <Directory /usr/lib/cgi-bin> to <Directory /var/www/www.mydomain.com/cgi-bin>
3. Create my own self-signed certificate:
The following will create a self-signed certificate and private key file in one file:
SSLCertificateFile /etc/ssl/certs/ssl-cert-snakeoil.pem
to
SSLCertificateFile /etc/ssl/certs/www.mydomain.com.pem
and
SSLCertificateKeyFile /etc/ssl/private/ssl-cert-snakeoil.key
to
SSLCertificateKeyFile /etc/ssl/private/www.mydomain.com.key
4. Password protect the Virtual host:
NOTE: To add more usernames and passwords to the same file you must:
htpasswd -s .htpasswd anotherusername
The .htaccess file must exist in the directory that you want to protect:
AuthUserFile /var/www/www.mydomain.com/.htpasswd
AuthType Basic
AuthName "Enter Login Details"
Require valid-user
1. Install LAMP environment:
Login as "root"
apt-get update

apt-get install mysql-server mysql-client apache2 ssl-cert php5 libapache2-mod-php5 php5-mysql php5-mcrypt php5-memcache php5-snmp php5-xmlrpc php5-xsl php5-suhosin apache2-suexec libapache2-mod-ruby libapache2-mod-perl2 libapache2-mod-python python-mysqldbecho "ServerName localhost" | sudo tee /etc/apache2/conf.d/fqdn
echo "<?php phpinfo(); ?>" > /var/www/info.php
nano /etc/php5/apache2/php.inichange memory_limit = 16M to memory_limit = 32M
/etc/init.d/apache2 restartFrom another PC type http://yourserverip/info.php in your browser and you should see some nice info about your PHP installation. After we've seen this page, we know PHP works and "info.php" can be removed:
rm -rf /var/www/info.phpnano /etc/apache2/ports.conf#NameVirtualHost *:80
#Listen 80
2. Configure a SSL and CGI ready Virtual Host:
a2enmod ssl

/etc/init.d/apache2 restart

mkdir -p /var/www/www.mydomain.com/public_html
mkdir /var/www/www.mydomain.com/cgi-bin
mkdir /var/www/www.mydomain.com/logs
cp /etc/apache2/sites-available/default-ssl /etc/apache2/sites-available/www.mydomain.com
nano /etc/apache2/sites-available/www.mydomain.com
Change ServerAdmin webmaster@localhost to ServerAdmin youremail@address
Add ServerName www.mydomain.com:443 under ServerAdmin line
Change DocumentRoot /var/www to DocumentRoot /var/www/www.mydomain.com/public_html
Change AllowOverride None to AllowOverride AuthConfig
Change <Directory /var/www/> to <Directory /var/www/www.mydomain.com/>
Change AllowOverride None to AllowOverride AuthConfig
Change ScriptAlias to ScriptAlias /cgi-bin/ /var/www/www.mydomain.com/cgi-bin/
Change <Directory "/usr/lib/cgi-bin"> to <Directory "/var/www/www.mydomain.com/cgi-bin">
Change ErrorLog /var/www/www.mydomain.com/logs/error.log
Change CustomLog to CustomLog /var/www/www.mydomain.com/logs/ssl_access.log combined
Change, under </FilesMatch>, <Directory /usr/lib/cgi-bin> to <Directory /var/www/www.mydomain.com/cgi-bin>
a2dissite default-ssl
a2ensite www.mydomain.com
/etc/init.d/apache2 restart
3. Create my own self-signed certificate:
The following will create a self-signed certificate and private key file in one file:
make-ssl-cert /usr/share/ssl-cert/ssleay.cnf /etc/ssl/private/www.mydomain.com.crt

cat /etc/ssl/private/www.mydomain.com.crtnano /etc/ssl/private/www.mydomain.com.keynano /etc/ssl/certs/www.mydomain.com.pemrm -f /etc/ssl/private/www.mydomain.com.crt
nano /etc/apache2/sites-available/www.mydomain.comSSLCertificateFile /etc/ssl/certs/ssl-cert-snakeoil.pem
to
SSLCertificateFile /etc/ssl/certs/www.mydomain.com.pem
and
SSLCertificateKeyFile /etc/ssl/private/ssl-cert-snakeoil.key
to
SSLCertificateKeyFile /etc/ssl/private/www.mydomain.com.key
/etc/init.d/apache2 restart

> /var/www/index.html4. Password protect the Virtual host:
cd /var/www/www.mydomain.comhtpasswd -c -s .htpasswd yourusernameNOTE: To add more usernames and passwords to the same file you must:
htpasswd -s .htpasswd anotherusername
The .htaccess file must exist in the directory that you want to protect:
nano /var/www/www.mydomain.com/public_html/.htaccessAuthUserFile /var/www/www.mydomain.com/.htpasswd
AuthType Basic
AuthName "Enter Login Details"
Require valid-user
/etc/init.d/apache2 restartSunday, April 4, 2010
Ubuntu, Trusted SSL Certificate install in Apache
Generating the Private Key file:
Your new CSR file will be located here:
Open your new certificate you just received and copy the part beginning with -----BEGIN CERTIFICATE----- and ending with -----END CERTIFICATE-----
Copy the chain file, given by your CA, to for example your /etc/ssl/certs/ directory on your server. Let's assume the chain filename is CAchainFile.pem
SSLCertificateChainFile /etc/ssl/certs/CAchainFile.pem
Apache needs to be restarted after this change:
http://cert.startcom.org
http://www.cacert.org
su root
apt-get update
apt-get install ssl-cert
make-ssl-cert /usr/share/ssl-cert/ssleay.cnf /etc/ssl/private/www.mydomainname.com.crtcat /etc/ssl/private/www.mydomainname.com.crtnano /etc/ssl/private/www.mydomainname.com.keyrm -f /etc/ssl/private/www.mydomainname.com.crt
mkdir /etc/ssl/csr
openssl req -new -key /etc/ssl/private/www.mydomainname.com.key -out /etc/ssl/csr/www.mydomainname.com.csrYour new CSR file will be located here:
cat /etc/ssl/csr/www.mydomainname.com.csrOpen your new certificate you just received and copy the part beginning with -----BEGIN CERTIFICATE----- and ending with -----END CERTIFICATE-----
nano /etc/ssl/certs/www.mydomainname.com.pem/etc/init.d/apache2 restartCopy the chain file, given by your CA, to for example your /etc/ssl/certs/ directory on your server. Let's assume the chain filename is CAchainFile.pem
nano /etc/apache2/sites-available/www.mydomainname.com-sslSSLCertificateChainFile /etc/ssl/certs/CAchainFile.pem
Apache needs to be restarted after this change:
/etc/init.d/apache2 restarthttp://cert.startcom.org
http://www.cacert.org
Friday, April 2, 2010
Ubuntu "Live / Install CD" from existing system
A. Prepare the environment:
1. Set the variables:
B. Copy existing installation into the new filesystem:
C. Chroot into the new system and modify it:
1. Chroot into the copied system after mounting proc and dev:
3. (Optional) If you want your live cd to have an installer, install the Ubuntu installer:
5. Update the modules.dep and initramfs:
6. Remove non system users: (script)
7. Delete these files: (script)
8. Cleanup the chroot environment:
10. Create needed log files in /var/log: (script)
D. Prepare The CD directory tree:
1. Copy the kernel, the updated initrd and memtest prepared in the chroot:
Note: This step is only needed if you installed the Ubuntu installer ubiquity. This step generates two files (filesystem.manifest & filesystem.manifest-desktop).
3. Unmount bind mounted dirs:
5. Make Grub the bootloader for the CD
Copy grub file:
E. Build the CD/DVD
1. Make the ISO file:
1. Set the variables:
export WORK=~/work
export CD=~/cd
export FORMAT=squashfs
export FS_DIR=caspersudo mkdir -p ${CD}/{${FS_DIR},boot/grub} ${WORK}/rootfssudo apt-get update
sudo apt-get install mkisofs grub squashfs-tools linux-headers-$(uname -r)B. Copy existing installation into the new filesystem:
sudo rsync -av --one-file-system --exclude=/proc/* --exclude=/dev/*\ --exclude=/sys/* --exclude=/tmp/* --exclude=/home/*\ --exclude=/lost+found / ${WORK}/rootfssudo cp -av /boot/* ${WORK}/rootfs/bootcp -r /home/yourusername/.config /home/yourusername/.xscreensaver /root/work/rootfs/etc/skel/C. Chroot into the new system and modify it:
1. Chroot into the copied system after mounting proc and dev:
sudo mount -o bind /dev/ ${WORK}/rootfs/dev
sudo mount -t proc proc ${WORK}/rootfs/proc
sudo chroot ${WORK}/rootfs /bin/bashLANG=
apt-get update
apt-get install casper discover1 xresprobe3. (Optional) If you want your live cd to have an installer, install the Ubuntu installer:
apt-get install ubiquity5. Update the modules.dep and initramfs:
depmod -a $(uname -r)
update-initramfs -u -k $(uname -r)6. Remove non system users: (script)
for i in `cat /etc/passwd | awk -F":" '{print $1}'`
do
        uid=`cat /etc/passwd | grep "^${i}:" | awk -F":" '{print $3}'`
        [ "$uid" -gt "999" -a  "$uid" -ne "65534"  ] && userdel --force ${i} 2>/dev/null
done7. Delete these files: (script)
for i in "/etc/hosts /etc/hostname /etc/resolv.conf /etc/timezone /etc/fstab /etc/mtab /etc/shadow /etc/shadow- /etc/gshadow  /etc/gshadow- /etc/gdm/gdm-cdd.conf /etc/X11/xorg.conf /boot/grub/menu.lst /boot/grub/device.map"
do
        rm $i
done 2>/dev/null8. Cleanup the chroot environment:
apt-get clean
find /var/run /var/log /var/mail /var/spool /var/lock /var/backups /var/tmp -type f -exec rm {} \;
rm -r /boot/*.bak /tmp/* /home/* /root/* 2>/dev/null[ -f "/etc/gdm/factory-gdm.conf" ] && cp -f /etc/gdm/factory-gdm.conf /etc/gdm/gdm.conf 2>/dev/null10. Create needed log files in /var/log: (script)
for i in dpkg.log lastlog mail.log syslog auth.log daemon.log faillog lpr.log mail.warn user.log boot debug mail.err messages wtmp bootstrap.log dmesg kern.log mail.info
do
        touch /var/log/${i}
donerm /usr/lib/ubiquity/apt-setup/generators/50cdromrm /usr/share/applications/ubiquity-gtkui.desktopexitD. Prepare The CD directory tree:
1. Copy the kernel, the updated initrd and memtest prepared in the chroot:
sudo cp -vp ${WORK}/rootfs/boot/vmlinuz-$(uname -r) ${CD}/boot/vmlinuz
sudo cp -vp ${WORK}/rootfs/boot/initrd.img-$(uname -r) ${CD}/boot/initrd.gz
sudo cp -vp ${WORK}/rootfs/boot/memtest86+.bin ${CD}/bootNote: This step is only needed if you installed the Ubuntu installer ubiquity. This step generates two files (filesystem.manifest & filesystem.manifest-desktop).
sudo chroot ${WORK}/rootfs dpkg-query -W --showformat='${Package} ${Version}\n' | sudo tee ${CD}/${FS_DIR}/filesystem.manifest
sudo cp -v ${CD}/${FS_DIR}/filesystem.manifest{,-desktop}
REMOVE='ubiquity casper user-setup discover1 xresprobe os-prober libdebian-installer4'for i in $REMOVE
do
sudo sed -i "/${i}/d" ${CD}/${FS_DIR}/filesystem.manifest-desktop
done3. Unmount bind mounted dirs:
sudo umount ${WORK}/rootfs/dev ${WORK}/rootfs/procsudo mksquashfs ${WORK}/rootfs ${CD}/${FS_DIR}/filesystem.${FORMAT}5. Make Grub the bootloader for the CD
Copy grub file:
sudo find /boot /usr/lib/grub/ -iname 'stage2_eltorito' -exec cp -v {} ${CD}/boot/grub \;sudo nano ${CD}/boot/grub/menu.lst# By default, boot the first entry.
default 0
# Boot automatically after 30 secs.
timeout 30
title System (Graphical Mode)
kernel /boot/vmlinuz BOOT=casper boot=casper nopersistent rw quiet splash
initrd /boot/initrd.gz
title System (Safe Graphical Mode)
kernel /boot/vmlinuz BOOT=casper boot=casper xforcevesa rw quiet splash
initrd /boot/initrd.gz
title Linux (Text Mode CLI)
kernel /boot/vmlinuz BOOT=casper boot=casper nopersistent textonly rw quiet
initrd /boot/initrd.gz
title Memory Test
kernel /boot/memtest86+.bin
title Boot the First Hard Disk
root (hd0)
chainloader +1cd $CD && find . -type f -print0 | xargs -0 sudo md5sum | sudo tee ${CD}/md5sum.txtE. Build the CD/DVD
1. Make the ISO file:
sudo mkisofs -b boot/grub/stage2_eltorito -no-emul-boot -boot-load-size 4 -boot-info-table -V "MY_LIVE_CD" -cache-inodes -r -J -l -o ~/my-live-install-cd.iso $CD
Subscribe to:
Posts (Atom)