
Friday, April 30, 2010
Cisco IOS DNS server configuration
Most users will probably only need to do the following to enable the Cisco IOS DNS server for name lookups:
86400 = 24 hours Refresh time
3600 = 1 hour Refresh retry time
1209600 = 14 days Authority expire time
86400 = 24 hours Minimum TTL for zone info
Router01(config)#ip dns server
Router01(config)#ip host Router02 192.168.1.2
Router01(config)#ip host Router03 192.168.1.3
Router01(config)#ip host Router04 192.168.1.4Router02(config)#ip name-server 192.168.1.1 (where 192.168.1.1 is the IP address of the router acting as DNS server)86400 = 24 hours Refresh time
3600 = 1 hour Refresh retry time
1209600 = 14 days Authority expire time
86400 = 24 hours Minimum TTL for zone info
Router01(config)#ip dns serverRouter01(config)#ip dns primary mywebsite1.com soa isp.ns1.mywebsite1.com admin@mywebsite1.com 86400 3600 1209600 86400
Router01(config)#ip host mywebsite1.com ns isp.ns1.mywebsite1.com
Router01(config)#ip host mywebsite1.com ns isp.ns2.mywebsite1.com
Router01(config)#ip host mywebsite1.com ns isp.ns3.mywebsite1.com
Router01(config)#ip host mywebsite1.com mx 1 mail.mywebsite1.com
Router01(config)#ip host mywebsite1.com mx 2 mail2.mywebsite1.com
Router01(config)#ip host mail.mywebsite1.com 192.168.1.40
Router01(config)#ip host mail2.mywebsite1.com 192.168.1.50
Router01(config)#ip host www.mywebsite1.com 192.168.1.30Router01(config)#ip dns primary mywebsite2.com soa isp.ns1.mywebsite2.com admin@mywebsite2.com 86400 3600 1209600 86400
Router01(config)#ip host mywebsite2.com ns isp.ns1.mywebsite2.com
Router01(config)#ip host mywebsite2.com ns isp.ns2.mywebsite2.com
Router01(config)#ip host mywebsite2.com ns isp.ns3.mywebsite2.com
Router01(config)#ip host mywebsite2.com mx 1 mail.mywebsite2.com
Router01(config)#ip host mywebsite2.com mx 2 mail2.mywebsite2.com
Router01(config)#ip host mail.mywebsite2.com 192.168.1.70
Router01(config)#ip host mail2.mywebsite2.com 192.168.1.80
Router01(config)#ip host www.mywebsite2.com 192.168.1.60Router01(config)#show hostsCisco site-to-site IPSEC encrypted VPN
The following will be assumed:
Router01 inside IP address = 192.168.0.1 255.255.255.0
Router01 outside IP address = 192.168.255.1 255.255.255.252
Router02 inside IP address = 192.168.1.1 255.255.255.0
Router02 outside IP address = 192.168.255.2 255.255.255.252
mysecretkey = can be anything, must be the same on both routers.
mytransform = can be anything, must be the same on both routers.
mycryptomap = can be anything, must be the same on both routers.
12345 = any number between 1-65535, sequence to insert into crypto map entry
Router01 setup:
Router01(config)#crypto isakmp policy 1
Router01(config-isakmp)#encryption 3des
Router01(config-isakmp)#authentication pre-share
Router01(config-isakmp)#group 2
Router01(config-isakmp)#exit
Router01(config)#crypto isakmp key mysecretkey address 192.168.255.2 no-xauth
Router01(config)#crypto ipsec transform-set mytransform esp-3des esp-sha-hmac
Router01(cfg-crypto-trans)#exit
Router01(config)#crypto map mycryptomap 12345 ipsec-isakmp
Router01(config-crypto-map)#set peer 192.168.255.2
Router01(config-crypto-map)#set transform-set mytransform
Router01(config-crypto-map)#match address ACL2Router02
Router01(config-crypto-map)#exit
Router01(config)#int s1/0
Router01(config-if)#crypto map mycryptomap
Router01(config-if)#no shut
Router01(config-if)#exit
Router01(config)#ip access-list extended ACL2Router02
Router01(config-ext-nacl)#20 permit ip 192.168.0.0 0.0.0.255 192.168.1.0 0.0.0.255
Router01(config-ext-nacl)#exit
Router01(config)#exitRouter02(config)#crypto isakmp policy 1
Router02(config-isakmp)#encryption 3des
Router02(config-isakmp)#authentication pre-share
Router02(config-isakmp)#group 2
Router02(config-isakmp)#exit
Router02(config)#crypto isakmp key mysecretkey address 192.168.255.1 no-xauth
Router02(config)#crypto ipsec transform-set mytransform esp-3des esp-sha-hmac
Router02(cfg-crypto-trans)#exit
Router02(config)#crypto map mycryptomap 12345 ipsec-isakmp
Router02(config-crypto-map)#set peer 192.168.255.1
Router02(config-crypto-map)#set transform-set mytransform
Router02(config-crypto-map)#match address ACL2Router01
Router02(config-crypto-map)#exit
Router02(config)#int s1/0
Router02(config-if)#crypto map mycryptomap
Router02(config-if)#no shut
Router02(config-if)#exit
Router02(config)#ip access-list extended ACL2Router01
Router02(config-ext-nacl)#20 permit ip 192.168.1.0 0.0.0.255 192.168.0.0 0.0.0.255
Router02(config-ext-nacl)#exit
Router02(config)#exitRouter#show crypto isakmp policy
Router#show crypto map
Router#show crypto ipsec transform-setThursday, April 29, 2010
Snow Leopard, Easy TFTP Server controls and Serial connectivity
I couldn't find a working TFTP server and serial Terminal for Mac OS X Snow Leopard, so I've put together two simple AppleScript programs to make life easier for updating Cisco routers and serial connectivity.
Download Links:
TFTP Controller
Serial Connection
To change the default TFTP server directory in Snow Leopard: NOTE that the directory must have full 777 permissions for all to be able to "get" and "put" data from and to TFTP server:
to your new path
<string>/Users/yourusername/TFTProot</string>
You can also start or stop the build-in TFTP server of Snow Leopard with the following commands:
Start TFTP server:
Download Links:
TFTP Controller
Serial Connection
To change the default TFTP server directory in Snow Leopard: NOTE that the directory must have full 777 permissions for all to be able to "get" and "put" data from and to TFTP server:
mkdir /Users/yourusername/TFTProot
chmod -R 777 /Users/yourusername/TFTProot

sudo nano /System/Library/LaunchDaemons/tftp.plistto your new path
<string>/Users/yourusername/TFTProot</string>
You can also start or stop the build-in TFTP server of Snow Leopard with the following commands:
Start TFTP server:
sudo launchctl load -F -w /System/Library/LaunchDaemons/tftp.plistsudo launchctl unload -F -w /System/Library/LaunchDaemons/tftp.plistCisco PPP with authentication
Cisco use HDLC encapsulation by default for point-to-point serial links. This is to setup PPP encapsulation with authentication, but note that there is no encryption on this link.
Encapsulation must be the same on both routers. Note how the hostname of the reverse router was used as the username. Passwords must be the same on both routers. PAP or CHAP authentication can be enabled.
Router 01 setup:
Encapsulation must be the same on both routers. Note how the hostname of the reverse router was used as the username. Passwords must be the same on both routers. PAP or CHAP authentication can be enabled.
Router 01 setup:
Router(config)#hostname Router01
Router01(config)#username Router02 password mypassword
Router01(config)#int s1/0
Router01(config-if)#ip address 192.168.1.1 255.255.255.0
Router01(config-if)#encapsulation ppp
Router01(config-if)#ppp authentication chap
Router01(config-if)#no shutRouter(config)#hostname Router02
Router02(config)#username Router01 password mypassword
Router02(config)#int s1/0
Router02(config-if)#ip address 192.168.1.2 255.255.255.0
Router02(config-if)#encapsulation ppp
Router02(config-if)#ppp authentication chap
Router02(config-if)#no shutRouter01#sh int s1/0
Router02#sh int s1/0Saturday, April 24, 2010
Logging events on Cisco routers
Log events to your Syslog server:
Router(config)#logging 192.168.1.1 (your syslog server ip)
Router(config)#logging trap ?
  <0-7>          Logging severity level
  alerts         Immediate action needed           (severity=1)
  critical       Critical conditions               (severity=2)
  debugging      Debugging messages                (severity=7)
  emergencies    System is unusable                (severity=0)
  errors         Error conditions                  (severity=3)
  informational  Informational messages            (severity=6)
  notifications  Normal but significant conditions (severity=5)
  warnings       Warning conditions                (severity=4)
  <cr>

Router(config)#logging trap notifications
Router(config)#logging source-interface fa0/0 (logging packets from a specific interface)
exitRouter(config)#logging buffered
Router#show logThe Gentoo KIOSK System - part1
In part1 of this guide I will setup the base CLI system. In part2 I will install X, some extras and lock the system down.

To most people reading this article, the following will seem irrelivant. If this is the case, skip to the part on how to build the KIOSK system.
To those that does not understand or choose to ignore the difference between the two words, "cannot" and "refuse", if you would tell the same lie enough to yourself, you will start believing it! I would like to give the following examples:
Quote from the Cambridge Online dictionary:
If you would say: I'll make him an offer he cannot refuse and "cannot" and "refuse" had the same meaning, You would have said: I'll make him an offer he refuse to refuse. Clearly this explains that the word "cannot" and the word "refuse" have two different meanings. In the Afrikaans language the synonym of this would be: Ek maak vir hom 'n aanbod wat hy nie kan weier nie. Cannot="nie kan" or "kan nie" and refuse="weier" If these two words had the same meaning I would have said in Afrikaans: Ek maak vir hom n' aanbod wat hy weier om te weier. This doesn't make sence and change the syntax completely...
Another example: To say "I cannot go to your wedding" and to say "I refuse to go to your wedding" means two different things. In the first example the person is not able to go to the wedding. In the second example the person can go but grossly choose not to go. In the Afrikaans language: "Ek kan nie na jou troue toe gaan nie" and "Ek weier om na jou troue toe te gaan" once again has two different meanings.
In other words, moral of the story... "Cannot" and "Refuse" does indeed have two different meanings.
That being said, here is the guide to setup and configure a completely locked down KIOSK system that can be used in KIOSKs or as in my case as a Super Duper client system for Call Centers with a Web driven backend. Nice thing is that to have your agents work on different systems (Web Backends), you can update all workstations in batch to point to the "URL" (backend system) that they need to work on. Agents can't fiddle with the system and break things... Yeaay...No Microsoft licensing costs... No viruses... Cheap hardware... The list goes on.
Download and burn the minimum installation CD:
http://www.gentoo.org/main/en/where.xml
Boot with minimal live cd
If it hangs at "Scanning... wd7000" reboot and boot with gentoo noload=pata_qdi
See what your IP address is.
Back to your main PC...
Now you're in and can start the install process.
Configuring disk partitions and filesystems:
press w to write the partition table.
Now to apply the filesystems and activate the swop partition:
Set Gentoo mirrors and sync:
replace SYNC="rsync://ftp.leg.uct.ac.za/gentoo-portage"
DNS configuration:
http://www.gentoo.org/doc/en/handbook/handbook-x86.xml?part=1&chap=7#kernel_modules
Creating new fstab and configuring mount points at boot:
Note that mount points must be defined as sda although your harddrive is hda.
The new kernels does not recognize hda anymore.
To most people reading this article, the following will seem irrelivant. If this is the case, skip to the part on how to build the KIOSK system.
To those that does not understand or choose to ignore the difference between the two words, "cannot" and "refuse", if you would tell the same lie enough to yourself, you will start believing it! I would like to give the following examples:
Quote from the Cambridge Online dictionary:
cannot (modal verb)
can not; the negative form of the verb 'can'
can (modal verb) ( ABILITY )
to be able to
Can you drive?
She can speak four languages.
Can you read that sign from this distance?
The doctors are doing all that they can, but she's still not breathing properly.
Do the best you can - I realize the circumstances are not ideal.
If the party is awful, we can always leave (= that would be one possible solution to our problem).
"She's really furious about it." "Can you blame her (= I'm not surprised)?"
refuse (verb)
to say that you will not do or accept something
If you would say: I'll make him an offer he cannot refuse and "cannot" and "refuse" had the same meaning, You would have said: I'll make him an offer he refuse to refuse. Clearly this explains that the word "cannot" and the word "refuse" have two different meanings. In the Afrikaans language the synonym of this would be: Ek maak vir hom 'n aanbod wat hy nie kan weier nie. Cannot="nie kan" or "kan nie" and refuse="weier" If these two words had the same meaning I would have said in Afrikaans: Ek maak vir hom n' aanbod wat hy weier om te weier. This doesn't make sence and change the syntax completely...
Another example: To say "I cannot go to your wedding" and to say "I refuse to go to your wedding" means two different things. In the first example the person is not able to go to the wedding. In the second example the person can go but grossly choose not to go. In the Afrikaans language: "Ek kan nie na jou troue toe gaan nie" and "Ek weier om na jou troue toe te gaan" once again has two different meanings.
In other words, moral of the story... "Cannot" and "Refuse" does indeed have two different meanings.
That being said, here is the guide to setup and configure a completely locked down KIOSK system that can be used in KIOSKs or as in my case as a Super Duper client system for Call Centers with a Web driven backend. Nice thing is that to have your agents work on different systems (Web Backends), you can update all workstations in batch to point to the "URL" (backend system) that they need to work on. Agents can't fiddle with the system and break things... Yeaay...No Microsoft licensing costs... No viruses... Cheap hardware... The list goes on.
Download and burn the minimum installation CD:
http://www.gentoo.org/main/en/where.xml
Boot with minimal live cd
If it hangs at "Scanning... wd7000" reboot and boot with gentoo noload=pata_qdi
passwd root/etc/init.d/sshd start ifconfigSee what your IP address is.
Back to your main PC...
ssh root@gentoo_ip_addressNow you're in and can start the install process.
Configuring disk partitions and filesystems:
fdisk /dev/hda
o
n
p
1
default cylinders
+128M
n
p
2
default cylinders
+2048M
n
p
3
default cylinders
default size
press w to write the partition table.
Now to apply the filesystems and activate the swop partition:
mke2fs /dev/hda1
mke2fs -j /dev/hda3
mkswap /dev/hda2
swapon /dev/hda2mount /dev/hda3 /mnt/gentoo
mkdir /mnt/gentoo/boot
mount /dev/hda1 /mnt/gentoo/bootcd /mnt/gentoo
wget ftp://ftp.is.co.za/linux/distributions/gentoo/releases/x86/current-stage3/stage3-i486-20100126.tar.bz2
tar xvjpf stage3-*.tar.bz2
wget ftp://ftp.is.co.za/linux/distributions/gentoo/releases/snapshots/current/portage-latest.tar.bz2
tar xvjf /mnt/gentoo/portage-latest.tar.bz2 -C /mnt/gentoo/usrnano -w /mnt/gentoo/etc/make.confFEATURES="ccache distlocks fixpackages parallel-fetch preserve-libs protect-owned sandbox sfperms strict unmerge-orphans userfetch"
INPUT_DEVICES="evdev"mkdir -p /mnt/gentoo/usr/lib/ccache/binSet Gentoo mirrors and sync:
mirrorselect -i -o >> /mnt/gentoo/etc/make.conf
mirrorselect -i -r -o >> /mnt/gentoo/etc/make.confnano -w /mnt/gentoo/etc/make.confreplace SYNC="rsync://ftp.leg.uct.ac.za/gentoo-portage"
DNS configuration:
cp -L /etc/resolv.conf /mnt/gentoo/etc/mount -t proc none /mnt/gentoo/proc
mount -o bind /dev /mnt/gentoo/devchroot /mnt/gentoo /bin/bash
env-update
source /etc/profile
export PS1="(chroot) $PS1"emerge --syncls -FGg /etc/make.profilenano -w /etc/make.confUSE="server zlib nsplugin motif nptl -debug -pic -xcb -gnome -kde -qt3 -qt4 dbus hal nptl X xorg -dmx -ipv6 -kdrive -minimal -sdl -tslib ssl alsa oss midi jpeg png xulrunner nspr nss ntp caps unicode" or what else you want or don't want between quotesemerge portagecp /usr/share/zoneinfo/Africa/Johannesburg /etc/localtimeemerge gentoo-sourcescd /usr/src/linuxmake menuconfigProcessor type and features
[*] Support for old Pentium 5 / WinChip machine checks
File systems
<*> Second extended fs support
[*] Ext2 extended attributes
[*] Ext2 POSIX Access Control Lists
[*] Ext2 Security Labels
[*] Ext2 execute in place support
File systems
CD-ROM/DVD Filesystems --->
<*> UDF file system support
File systems
DOS/FAT/NT Filesystems --->
<*> NTFS file system support
[*] NTFS write support
File systems
Network File Systems --->
<*> CIFS support (advanced network filesystem, SMBFS successor)
[*] CIFS statistics
[*] Extended statistics
[*] Support legacy servers which use weaker LANMAN security
[*] Kerberos/SPNEGO advanced session setup
[*] CIFS extended attributes
[*] CIFS POSIX Extensions
Device Drivers --->
<M> Sound card support --->
<M> Advanced Linux Sound Architecture --->
<M> Sequencer support
<M> Sequencer dummy client
<M> OSS Mixer API
<M> OSS PCM (digital audio) API
[*] OSS PCM (digital audio) API - Include plugin system
[*] OSS Sequencer API
<M> HR-timer backend support
[*] Use HR-timer as default sequencer timer
[ ] Support old ALSA API
PCI sound devices --->
<M> Intel/SiS/nVidia/AMD/ALi AC97 Controller
<M> VIA 82C686A/B, 8233/8235 AC97 Controller
Graphics support --->
<*> /dev/agpgart (AGP Support) --->
<*> ALI chipset support
<*> ATI chipset support
<*> NVIDIA nForce/nForce2 chipset support
<*> VIA chipset support
<*> Direct Rendering Manager (XFree86 4.1.0 and higher DRI support) --->
<*> ATI Radeon
<*> Intel I810
-*- Support for frame buffer devices --->
[*] Enable firmware EDID
[ ] Enable Tile Blitting Support
[*] VESA VGA graphics support
<*> nVidia Framebuffer Support
[*] Enable DDC Support
<*> Intel 810/815 support (EXPERIMENTAL)
<*> Matrox acceleration
<*> ATI Radeon display support
[ ] Bootup logo --->
Network device support --->
[*] Ethernet (10 or 100Mbit) --->
<*> 3c590/3c900 series (592/595/597) "Vortex/Boomerang" support
<*> 3cr990 series "Typhoon" support
<*> Broadcom 440x/47xx ethernet support
[*] Support for older RTL-8129/8130 boards
[*] Ethernet (1000 Mbit) --->
<*> Intel(R) 82575/82576 PCI-Express Gigabit Ethernet support
<*> JMicron(R) PCI-Express Gigabit Ethernet support
<*> Broadcom CNIC support
Bus options (PCI etc.) --->
[*] Enable deprecated pci_find_* API
Kernel hacking --->
[*] Enable unused/obsolete exported symbolsmake && make modules_install
cp arch/i386/boot/bzImage /boot/kernel-2.6.31-gentoo-r6http://www.gentoo.org/doc/en/handbook/handbook-x86.xml?part=1&chap=7#kernel_modules
Creating new fstab and configuring mount points at boot:
Note that mount points must be defined as sda although your harddrive is hda.
The new kernels does not recognize hda anymore.
nano -w /etc/fstab

/dev/sda1               /boot           ext2            noauto,noatime          1 2
/dev/sda2               none            swap            sw                      0 0
/dev/sda3               /               ext3            noatime                 0 1
/dev/cdrom              /mnt/cdrom      auto            noauto,user             0 0
#/dev/fd0               /mnt/floppy     auto            noauto                  0 0
proc                    /proc           proc            defaults                0 0
shm /dev/shm tmpfs nodev,nosuid,noexec 0 0nano -w /etc/conf.d/hostname
HOSTNAME="your_preferred_hostname"nano -w /etc/conf.d/net
dns_domain_lo="your_preferred_domain_name"
#config_eth0=( "192.168.0.2 netmask 255.255.255.0 brd 192.168.0.255" )
#routes_eth0=( "default via 192.168.0.1" )
config_eth0=( "dhcp" )rc-update add net.eth0 defaultnano -w /etc/hostspasswd rootnano -w /etc/conf.d/clock
CLOCK="local"
TIMEZONE="Johannesburg"emerge syslog-ng
rc-update add syslog-ng default
emerge logrotate
emerge vixie-cron
rc-update add vixie-cron default
emerge jfsutils
emerge dhcpcd
emerge net-misc/ntp
nano -w /etc/ntp.conf
server ntp.time.za.net
rc-update add ntpd default
rm /etc/adjtimehwclock --local --systohc
cd /
touch currtime
find . -cnewer /currtime -exec touch {} \; (Don't worry about errors)
rm -rf /currtime
rc-update add sshd default
rc-update del netmount
emerge mingetty
emerge sudoemerge grub
nano -w /boot/grub/grub.conf
default 0
timeout 1
#splashimage=(hd0,0)/boot/grub/splash.xpm.gz
title Gentoo Linux 2.6.31-r6
root (hd0,0)
kernel /boot/kernel-2.6.31-gentoo-r6 root=/dev/sda3
grep -v rootfs /proc/mounts > /etc/mtab
grub-install --no-floppy /dev/hdanano -w /etc/rc.conf
CONSOLEFONT="default8x9"exit
cd
umount /mnt/gentoo/boot /mnt/gentoo/dev /mnt/gentoo/proc /mnt/gentoo
rebootThe Gentoo KIOSK System - part2
Part2 of the Gentoo Linux KIOSK system. Here I will configure the X system, extras and lock the system down.

DefaultDepth 24
Then in SubSection "Display", Depth 24 add the following under Depth 24
Modes "1024x768" "800x600"
Under Section "InputDevice", replace:
Driver "kbd"
with
Driver "evdev"
and
Driver "mouse"
with
Driver "evdev"
Adding the client user:
with
c1:12345:respawn:/sbin/mingetty --autologin clientsales --noclear tty1
#Disable ctrl+alt+delete key combination
# What to do at the "Three Finger Salute".
#ca:12345:ctrlaltdel:/sbin/shutdown -r now
clientsales ALL=(ALL) NOPASSWD: ALL
Installaing VNC server:
Installing sound:
## Please note: Firefox 3.6 and newer does NOT work this way with Java plugin
Installing firefox with all dependencies:
Installing Adobe Flash plugin:
Download tar.gz version from Adobe
copy gz file to /opt/
Installaing Sun Java Runtime Environment:
Adding environment variables for JAVA, lockdown and make X automatically start at boot for the clientsales user profile.
Adding some cron entries if needed:
user_pref("accessibility.browsewithcaret", false);
user_pref("accessibility.warn_on_browsewithcaret", false);
user_pref("browser.startup.homepage", "file:///home/clientsales/index.html");
/etc/prep_default_page.sh
RC_PARALLEL_STARTUP="yes"
RC_INTERACTIVE="no"
Cleaning up the system and make it smaller:
Purge Unused Locales:
en_US ISO-8859-1
en_US.UTF-8 UTF-8
NOTE: After these commands ran, Kernel source, portage, man pages, exc will be removed. You will not be able to add more software to this system via emerge anymore.
Install the Firefox r-kiosk plugin https://addons.mozilla.org/en-US/firefox/addon/1659
Reboot your system!
This can now be packeged into a nice self-installer CD for rapid deployment to similar hardware.
HINT: The default homepage URL can be changed in batch with scripting. The URL and all other Firefox specific settings can be altered in /home/clientsales/.mozilla/firefox/-somenumber-/prefs.js
emerge xorg-server (if you get "A file is not listed in the Manifest"... do, nano /etc/make.conf and FEATURES=-strict)
env-update
source /etc/profile
/etc/init.d/hald start
rc-update add hald default
Xorg -configure
cp /root/xorg.conf.new /etc/X11/xorg.conf
rm -rf /root/xorg.conf.new
nano -w /etc/X11/xorg.confDefaultDepth 24
Then in SubSection "Display", Depth 24 add the following under Depth 24
Modes "1024x768" "800x600"
Under Section "InputDevice", replace:
Driver "kbd"
with
Driver "evdev"
and
Driver "mouse"
with
Driver "evdev"
Adding the client user:
useradd -m -G users,audio,wheel clientsalesnano -w /etc/inittabwith
c1:12345:respawn:/sbin/mingetty --autologin clientsales --noclear tty1
#Disable ctrl+alt+delete key combination
# What to do at the "Three Finger Salute".
#ca:12345:ctrlaltdel:/sbin/shutdown -r now
nano /etc/sudoersclientsales ALL=(ALL) NOPASSWD: ALL
Installaing VNC server:
emerge net-misc/tigervnc
vncpasswd
su clientsales
vncpasswd
exit
nano /etc/X11/xorg.conf
Add the following to Section "Module"
Load "vnc"
Add the following to Section "Screen"
Option "PasswordFile" "/home/clientsales/.vnc/passwd"Installing sound:
emerge alsa-utils
alsamixer to configure sound levels
alsaconf
rc-update add alsasound boot
## Please note: Firefox 3.6 and newer does NOT work this way with Java plugin
Installing firefox with all dependencies:
emerge mozilla-firefox
emerge -C mozilla-firefox
cd /opt
wget http://mirror.atratoip.net/mozilla/firefox/releases/3.5.7/linux-i686/is/firefox-3.5.7.tar.bz2
bzip2 firefox-3.5.7.tar.bz2
Installing Adobe Flash plugin:
Download tar.gz version from Adobe
copy gz file to /opt/
tar -zxvf install_flash_player_10_linux.tar
move the .so file to /opt/firefox/plugins/
Installaing Sun Java Runtime Environment:
emerge -C dev-java/icedtea6-binchmod +x jre-6u20-linux-i586.bin
./jre-6u20-linux-i586.bin
ln -s /opt/jre1.6.0_18/plugin/i386/ns7/libjavaplugin_oji.so /opt/firefox/plugins/libjavaplugin_oji.soAdding environment variables for JAVA, lockdown and make X automatically start at boot for the clientsales user profile.
su clientsales
nano /home/clientsales/.bashrc (Add the following:)
export J2RE_HOME=/opt/jre1.6.0_18
export PATH=$J2RE_HOME/bin:$PATH
sudo /bin/stty intr undef
sudo /bin/stty kill undef
sudo /bin/stty quit undef
sudo /bin/stty susp undef
sudo startx &>/dev/null

exit
nano startxuserclientrc=$HOME/.xinitrc
sysclientrc=/etc/X11/xinit/xinitrc
userserverrc=$HOME/.xserverrc
sysserverrc=/etc/X11/xinit/xserverrc
defaultclientargs=""
defaultserverargs="-nolisten tcp -br"
clientargs=""
serverargs=""
if [ -f $userclientrc ]; then
defaultclientargs=$userclientrc
elif [ -f $sysclientrc ]; then
defaultclientargs=$sysclientrc
fi
if [ -f $userserverrc ]; then
defaultserverargs=$userserverrc
elif [ -f $sysserverrc ]; then
defaultserverargs=$sysserverrc
fi
whoseargs="client"
while [ x"$1" != x ]; do
case "$1" in
/''*|\.*) if [ "$whoseargs" = "client" ]; then
if [ "x$clientargs" = x ]; then
clientargs="$1"
else
clientargs="$clientargs $1"
fi
else
if [ "x$serverargs" = x ]; then
serverargs="$1"
else
serverargs="$serverargs $1"
fi
fi ;;
--) whoseargs="server" ;;
*) if [ "$whoseargs" = "client" ]; then
if [ "x$clientargs" = x ]; then
clientargs="$defaultclientargs $1"
else
clientargs="$clientargs $1"
fi
else
case "$1" in
:[0-9]*) display="$1"; serverargs="$serverargs $1";;
*) serverargs="$serverargs $1" ;;
esac
fi ;;
esac
shift
done
if [ x"$clientargs" = x ]; then
clientargs="$defaultclientargs"
fi
if [ x"$serverargs" = x ]; then
serverargs="$defaultserverargs"
fi
if [ x"$XAUTHORITY" = x ]; then
XAUTHORITY=$HOME/.Xauthority
export XAUTHORITY
fi
removelist=
# set up default Xauth info for this machine
case `uname` in
Linux*)
if [ -z "`hostname --version 2>&1 | grep GNU`" ]; then
hostname=`hostname -f`
else
hostname=`hostname`
fi
;;
*)
hostname=`hostname`
;;
esac
authdisplay=${display:-:0}
mcookie=`/usr/bin/mcookie`
dummy=0
# create a file with auth information for the server. ':0' is a dummy.
xserverauthfile=$HOME/.serverauth.$$
xauth -q -f $xserverauthfile << EOF
add :$dummy . $mcookie
EOF
serverargs=${serverargs}" -auth "${xserverauthfile}
# now add the same credentials to the client authority file
# if '$displayname' already exists don't overwrite it as another
# server man need it. Add them to the '$xserverauthfile' instead.
for displayname in $authdisplay $hostname$authdisplay; do
authcookie=`xauth list "$displayname" \
| sed -n "s/.*$displayname[[:space:]*].*[[:space:]*]//p"` 2>/dev/null;
if [ "z${authcookie}" = "z" ] ; then
xauth -q << EOF
add $displayname . $mcookie
EOF
removelist="$displayname $removelist"
else
dummy=$(($dummy+1));
xauth -q -f $xserverauthfile << EOF
add :$dummy . $authcookie
EOF
fi
done
cleanup() {
[ -n "$PID" ] && kill $PID > /dev/null 2>&1
if [ x"$removelist" != x ]; then
xauth remove $removelist
fi
if [ x"$xserverauthfile" != x ]; then
rm -f $xserverauthfile
fi
if command -v deallocvt > /dev/null 2>&1; then
deallocvt
fi
}
trap cleanup 0
xinit $clientargs -- $serverargs -deferglyphs 16 &
PID=$!
wait $PID
unset PIDchmod +x startx
cp startx /usr/bin/startxnano xinitrcuserresources=$HOME/.Xresources
usermodmap=$HOME/.Xmodmap
xinitdir=/etc/X11
sysresources=$xinitdir/Xresources
sysmodmap=$xinitdir/Xmodmap
# merge in defaults and keymaps
if [ -f $sysresources ]; then
xrdb -merge $sysresources
fi
if [ -f $sysmodmap ]; then
xmodmap $sysmodmap
fi
if [ -f $userresources ]; then
xrdb -merge $userresources
fi
if [ -f $usermodmap ]; then
xmodmap $usermodmap
fi
# First try ~/.xinitrc
if [ -f "$HOME/.xinitrc" ]; then
XINITRC="$HOME/.xinitrc"
if [ -x $XINITRC ]; then
# if the x bit is set on .xinitrc
# it means the xinitrc is not a
# shell script but something else
exec $XINITRC
else
exec /bin/sh "$HOME/.xinitrc"
fi
# If not present, try the system default
elif [ -n "`/etc/X11/chooser.sh`" ]; then
exec "`/etc/X11/chooser.sh`"
# Failsafe
else
# start some nice programs
#twm &
#xclock -geometry 50x50-1+1 &
#xterm -geometry 80x50+494+51 &
#xterm -geometry 80x20+494-0 &
#exec xterm -geometry 80x66+0+0 -name login
exec /opt/firefox/firefox
fichmod +x xinitrc
cp xinitrc /etc/X11/xinit/xinitrcAdding some cron entries if needed:
crontab -einit 6nano /home/clientsales/.mozilla/firefox/THIS_WILL_BE_DIFFERENT.default/localstore.rdf
sizemode="maximized"
width="1024"
height="768"nano /home/clientsales/.mozilla/firefox/THIS_WILL_BE_DIFFERENT.default/prefs.jsuser_pref("accessibility.browsewithcaret", false);
user_pref("accessibility.warn_on_browsewithcaret", false);
user_pref("browser.startup.homepage", "file:///home/clientsales/index.html");
mkdir /home/clientsales/.startpage
mkdir /home/clientsales/.startpage/images
nano /home/clientsales/.startpage/defaulthtml<!DOCTYPE HTML PUBLIC "-//W3C//DTD HTML 4.01 Transitional//EN">
<html>
<head>
<title>Unconfigured System!</title>
</head>
<body bgcolor="#000000" text="#FFFFFF" link="#FFFFFF" vlink="#FFFFFF">
<br>
<br>
<br>
<br>
<br>
<br>
<center><img src="./.startpage/images/stop.png" /></center>
<br>
<br>
<center><font size="3"><b>This system needs to be configured.
<br>
<br>
<font size="8">
Network problem detected!
</font>
<br>
<br>
Please contact the HELPDESK for support!</b></b></font></center>
</body>
</html>chown -R clientsales:clientsales /home/clientsales/
nano /etc/prep_default_page.sh#!/bin/bash
##URL in prefs.js must be pointing to: file:////home/clientsales/index.html
ipaddr=`ifconfig |grep Bcast |sed 's/Bcast.*//' |sed 's/ inet addr://'`
if [ "$ipaddr" == "" ]
then
cat /home/clientsales/.startpage/defaulthtml > /home/clientsales/index.html
else
cat /home/clientsales/.startpage/defaulthtml |sed "s/Network problem detected!/IP Address: $ipaddr/" |sed 's/stop.png/exclam.png/' > /home/clientsales/index.html
fichmod +x /etc/prep_default_page.sh
chown root:root /etc/prep_default_page.sh
nano /etc/conf.d/local.start/etc/prep_default_page.sh
nano /etc/conf.d/rcRC_PARALLEL_STARTUP="yes"
RC_INTERACTIVE="no"
Cleaning up the system and make it smaller:
Purge Unused Locales:
nano /etc/locale.genen_US ISO-8859-1
en_US.UTF-8 UTF-8
locale-genNOTE: After these commands ran, Kernel source, portage, man pages, exc will be removed. You will not be able to add more software to this system via emerge anymore.
rm -rf /home/clientsales/.serverauth.*
rm -rf /usr/portage/*
rm -rf /var/tmp/portage/*
rm -rf /usr/share/man/*
rm -rf /usr/src/linux-*
rm -rf /usr/share/portage/*
rm -rf /usr/share/man/*
rm -rf /var/tmp/*
rm -rf /usr/share/doc
rm -rf /var/log/*
rm -rf /var/db/pkg/*
rm -rf /root/.mozilla
rm -rf /usr/share/locale/a*
rm -rf /usr/share/locale/b*
rm -rf /usr/share/locale/c*
rm -rf /usr/share/locale/d*
rm -rf /usr/share/locale/f*
rm -rf /usr/share/locale/g*
rm -rf /usr/share/locale/h*
rm -rf /usr/share/locale/i*
rm -rf /usr/share/locale/j*
rm -rf /usr/share/locale/k*
rm -rf /usr/share/locale/m*
rm -rf /usr/share/locale/n*
rm -rf /usr/share/locale/o*
rm -rf /usr/share/locale/p*
rm -rf /usr/share/locale/q*
rm -rf /usr/share/locale/r*
rm -rf /usr/share/locale/s*
rm -rf /usr/share/locale/t*
rm -rf /usr/share/locale/v*
rm -rf /usr/share/locale/w*
rm -rf /usr/share/locale/x*
rm -rf /usr/share/locale/y*
rm -rf /usr/share/locale/z*
rm -rf /usr/share/locale/el*
rm -rf /usr/share/locale/eo*
rm -rf /usr/share/locale/es*
rm -rf /usr/share/locale/et*
rm -rf /usr/share/locale/lg*
rm -rf /usr/share/locale/li*
rm -rf /usr/share/locale/lt*
rm -rf /usr/share/locale/lv*
rm -rf /usr/share/locale/ug*
rm -rf /usr/share/locale/ur*
rm -rf /usr/share/locale/uz*
find / \( -iname ".serverauth.*" \) -deleteecho "1.000-2.6.31r6-i686" > /etc/buildInstall the Firefox r-kiosk plugin https://addons.mozilla.org/en-US/firefox/addon/1659
Reboot your system!
This can now be packeged into a nice self-installer CD for rapid deployment to similar hardware.
HINT: The default homepage URL can be changed in batch with scripting. The URL and all other Firefox specific settings can be altered in /home/clientsales/.mozilla/firefox/-somenumber-/prefs.js
Wednesday, April 21, 2010
Cisco IOS VPN Server and Client config
Allowing VPN Clients to Connect IPsec and still allow Internet access using Split Tunneling configuration.
This configuration assumes the following:
VPN Client Username: myusername
VPN Client Password: mypassword
VPN Group authentication name: mygroupname
VPN Group authentication password: mygroupkey
Your internal DNS: 192.168.1.100
Your domain: mydomain
IPs to be assigned to VPN clients: 192.168.1.5 to 192.168.1.10/24
FastEthernet0/0 is the router's outside interface
Router configuration:
Install the Cisco VPN client. Restart your computer. Open the VPN client and click "New". Fill out the details you just configured on your router:
NOTE: Still getting Error 2738 with Windows 7 install?
Bring up an administrative terminal:
Start --> Run --> Type "cmd" hold ctrl+shift and press ENTER
Re-register VBScript engine:
reg delete "HKCU\SOFTWARE\Classes\CLSID\{B54F3741-5B07-11CF-A4B0-00AA004A55E8}" /f
%systemroot%\system32\regsvr32 vbscript.dll

Click "Save". Double click your new Connection entry and supply your configured Username and Password.
Check that all is working:
Reference: http://www.cisco.com/en/US/products/hw/routers/ps274/products_configuration_example09186a0080819289.shtml#vpn405
This configuration assumes the following:
VPN Client Username: myusername
VPN Client Password: mypassword
VPN Group authentication name: mygroupname
VPN Group authentication password: mygroupkey
Your internal DNS: 192.168.1.100
Your domain: mydomain
IPs to be assigned to VPN clients: 192.168.1.5 to 192.168.1.10/24
FastEthernet0/0 is the router's outside interface
Router configuration:
Router(config)#aaa new-model
Router(config)#aaa authentication login userauth local-case
Router(config)#aaa authorization network groupauth local
Router(config)#username myusername password 0 mypassword
Router(config)#crypto isakmp policy 3
Router(config-isakmp)#encryption 3des
Router(config-isakmp)#authentication pre-share
Router(config-isakmp)#group 2
Router(config-isakmp)#exit
Router(config)#crypto isakmp client configuration group mygroupname
Router(config-isakmp-group)#key mygroupkey
Router(config-isakmp-group)#dns 192.168.1.100
Router(config-isakmp-group)#domain mydomain
Router(config-isakmp-group)#pool myvpnpool
Router(config-isakmp-group)#acl 101
Router(config-isakmp-group)#exit
Router(config)#crypto ipsec transform-set myset esp-3des esp-md5-hmac
Router(cfg-crypto-trans)#exit
Router(config)#crypto dynamic-map dynmap 10
Router(config-crypto-map)#set transform-set myset
Router(config-crypto-map)#reverse-route
Router(config-crypto-map)#exit
Router(config)#crypto map clientmap client authentication list userauth
Router(config)#crypto map clientmap isakmp authorization list groupauth
Router(config)#crypto map clientmap client configuration address respond
Router(config)#crypto map clientmap 10 ipsec-isakmp dynamic dynmap
Router(config)#int fa0/0
Router(config-if)#ip address <outside_IP_address> <subnet_mask>
Router(config-if)#no shut
Router(config-if)#ip nat outside
Router(config-if)#crypto map clientmap
Router(config-if)#exit
Router(config)#ip local pool myvpnpool 192.168.1.5 192.168.1.10
Router(config)#ip nat inside source list 111 interface FastEthernet0/0 overload
Router(config)#access-list 111 deny ip <local_network_IP> <inverted mask> 192.168.1.0 0.0.0.255
Router(config)#access-list 111 permit ip any any
Router(config)#access-list 101 permit ip <local_network_IP> <inverted mask> 192.168.1.0 0.0.0.255Install the Cisco VPN client. Restart your computer. Open the VPN client and click "New". Fill out the details you just configured on your router:
NOTE: Still getting Error 2738 with Windows 7 install?
Bring up an administrative terminal:
Start --> Run --> Type "cmd" hold ctrl+shift and press ENTER
Re-register VBScript engine:
reg delete "HKCU\SOFTWARE\Classes\CLSID\{B54F3741-5B07-11CF-A4B0-00AA004A55E8}" /f
%systemroot%\system32\regsvr32 vbscript.dll

Click "Save". Double click your new Connection entry and supply your configured Username and Password.
Check that all is working:
Router#show crypto isakmp saRouter#show crypto ipsec saReference: http://www.cisco.com/en/US/products/hw/routers/ps274/products_configuration_example09186a0080819289.shtml#vpn405
Friday, April 16, 2010
Howto post code snippets on your Blog
In your Blogger HTML template, insert the style/javascript code between the following two lines:
<div class='post-header-line-1'/>
</div><style type="text/css">
pre.source-code {
font-family: Andale Mono, Lucida Console, Monaco, fixed, monospace;
color: #ffffff;
background-color: #000;
font-size: 12px;
border: 1px dashed #999999;
line-height: 14px;
padding: 5px;
overflow: auto;
width: 100%
}
p.warning {
color: #000000;
background-color: #FFB6C1;
font-size: 12px;
border: 3px double #333333;
line-height: 14px;
padding: 5px;
overflow: auto;
width: 100%
}
</style>
<script language="JavaScript">
<!--
var Color= new Array();
Color[1] = "ff";
Color[2] = "ee";
Color[3] = "dd";
Color[4] = "cc";
Color[5] = "bb";
Color[6] = "aa";
Color[7] = "99";
function fadeIn(where) {
if (where >= 1) {
document.getElementById('fade').style.backgroundColor = "#ffff" + Color[where];
if (where > 1) {
where -= 1;
setTimeout("fadeIn("+where+")", 200);
} else {
where -= 1;
setTimeout("fadeIn("+where+")", 200);
document.getElementById('fade').style.backgroundColor = "transparent";
}
}
}
function format() {
var strIn = document.getElementById("textin").value;
var strOut = null;
if ( document.getElementById("embedstyle").checked ) {
strOut = "<pre style=\"font-family: Andale Mono, Lucida Console, Monaco, fixed, monospace; color: #000000; background-color: #eee;font-size: 12px;border: 1px dashed #999999;line-height: 14px;padding: 5px; overflow: auto; width: 100%\"><code>";
hideElement("style");
} else {
strOut = "<pre class=\"source-code\"><code>";
showElement("style");
}
var strOut25 = null;
var line = 1;
var strTab;
var hasVerticalPipe = false;
var j;
if ( document.getElementById("tab4").checked ) {
strTab = " ";
} else if ( document.getElementById("tab2").checked ) {
strTab = " ";
} else {
strTab = " ";
}
for ( i = 0; i < strIn.length; i++ ) {
var code = strIn.charCodeAt(i);
switch( code ) {
case 9: // tab
strOut += strTab;
break;
case 10: // line-feed
case 13:
strOut += "\n";
line += 1;
if ( line == 26 ) {
strOut25 = strOut + "[only the first 25 lines shown in this example]\n\n";
}
j = i + 1;
if ( code == 13 && j < strIn.length && strIn.charCodeAt(j) == 10 ) {
i++;
}
break;
case 34:
strOut += """;
break;
case 38:
strOut += "&";
break;
case 60:
strOut += "<";
break;
case 62:
strOut += ">";
break;
case 124: // vertical pipe (blogger modifies this)
strOut += "|";
hasVerticalPipe = true;
break;
default:
if ( code >= 32 && code <= 127 ) {
strOut += strIn.charAt(i);
} else {
strOut += "&#" + code + ";";
}
break;
} // switch
} // for
strOut += "\n</code></pre>
";
var textoutelement = document.getElementById("textout")
textoutelement.value = strOut;
textoutelement.focus();
textoutelement.select();
if ( hasVerticalPipe ) {
showElement( "vert-pipe-warning" );
} else {
hideElement( "vert-pipe-warning" );
}
var resultselement = document.getElementById("results");
if ( strOut25 != null ) {
resultselement.innerHTML = strOut25;
} else {
resultselement.innerHTML = strOut;
}
fadeIn(7);
}
function onloadEvent() {
var textinelement = document.getElementById("textin");
textinelement.focus();
textinelement.select();
}
function showElement(strId) {
var ref = document.getElementById(strId);
if ( ref.style) { ref = ref.style; }
ref.display = '';
}
function hideElement(strId) {
var ref = document.getElementById(strId);
if ( ref.style) { ref = ref.style; }
ref.display = 'none';
}
//-->
</script><code><pre class="source-code"><code>and the following END TAG:
</code></pre>Tuesday, April 13, 2010
MySQL, getting data in and out with Perl/CGI
Creating the database and tables:
Creating Indexes:
Inserting data into the MySQL database with Perl/CGI/HTML:
The HTML file; Call it insert.html and put it in the root of the website.
And test: http://192.168.1.1/insert.html
Display the inserted data with Perl/CGI:
And test: http://192.168.1.1/cgi-bin/displaydata.pl
mysql -u root -p
mysql> CREATE DATABASE tv;
mysql> USE tv;
mysql> CREATE TABLE episodeguide (id INT NOT NULL AUTO_INCREMENT PRIMARY KEY, tvshow VARCHAR(50), shownumber VARCHAR(20), showtitle VARCHAR(50), aired VARCHAR(20), overview VARCHAR(500));Creating Indexes:
mysql> CREATE INDEX tvshow ON episodeguide (tvshow);
mysql> CREATE INDEX showtitle ON episodeguide (showtitle);
mysql> CREATE INDEX overview ON episodeguide (overview);
mysql> exit
Inserting data into the MySQL database with Perl/CGI/HTML:
The HTML file; Call it insert.html and put it in the root of the website.
<form action="https://192.168.1.1/cgi-bin/insertdata.pl"
method="post">
<html>
<head>
<title>TV Episode Data Capture Form</title>
</head>
<body>
<H1>TV Episode Data Capture Form</H1>
<P>
<HR>
<H2>Episode submission form: </H2>
TV Show Name:
<select name="tvshow">
<option selected>SHOW
<option>TV Show 1
<option>TV Show 2
<option>TV Show 3
<option>TV Show 4
<option>TV Show 5
</select>
<P>
Episode Number:
<select name="shownumber">
<option selected>NUMBER
<option>01
<option>02
<option>03
<option>04
<option>05
<option>06
<option>07
<option>08
<option>09
<option>10
<option>11
<option>12
<option>13
<option>14
<option>15
<option>16
<option>17
<option>18
<option>19
<option>20
<option>21
<option>22
<option>23
<option>24
<option>25
<option>26
<option>27
<option>28
<option>29
<option>30
<option>31
</select>
<P>
Episode Title: <input name="showtitle"><P>
Original Aired: <input name="aired"><P>
<P>
Episode Description:
<P>
<textarea name="overview" rows=5 cols=60></textarea>
<P>
<input type="submit" value="Click to submit entry">
</form>#!/usr/bin/perl
use CGI qw(:standard);
use DBI;
print <<END;
Content-type: text/html
<html>
<head>
<title>TV Episode capture Form</title>
</head>
<body bgcolor="white">
END
# database connection info
$db="tv";
$host="localhost";
$userid="mysql_username";
$passwd="mysql_password";
$connectionInfo="dbi:mysql:$db;$host";
$tvshow = param('tvshow');
$shownumber = param('shownumber');
$showtitle = param('showtitle');
$aired = param('aired');
$overview = param('overview');
$year = param('minutesstart');
$month = param('yearstop');
$day = param('monthstop');
# connect to database
$dbh = DBI->connect($connectionInfo,$userid,$passwd);
# prepare and execute query
$query = "INSERT INTO episodeguide (tvshow,shownumber,showtitle,aired,overview) VALUES(\"$tvshow\",\"Episode $shownumber\",\"$showtitle\",\"$aired\",\"$overview\");";
$sth = $dbh->prepare($query) || die "Could not prepare SQL statement ... maybe invalid?";
$sth->execute() || die "Could not execute SQL statement ... maybe invalid?";
# assign fields to variables
$sth->bind_columns(\$ID, \$tvshow, \$shownumber, \$showtitle, \$aired, \$overview);
# output thanks message to browser
print "<b>Your entry was sucessfully captured in the database!</b><p>\n";
print "</table>\n";
print "</body>\n";
print "</html>\n";
$sth->finish();
# disconnect from database
$dbh->disconnect;
sub fail {
print "<title>Error</title>",
"<p>ERROR: An error ocured, please try again!</p>";
exit; }chmod 755 /var/www/cgi-bin/insertdata.plAnd test: http://192.168.1.1/insert.html
Display the inserted data with Perl/CGI:
nano /var/www/cgi-bin/displaydata.pl#!/usr/bin/perl -w
use DBI;
print <<END;
Content-type: text/html
<html>
<head>
<title>Display my data!</title>
</head>
<body bgcolor="white">
END
# database connection info
$db="tv";
$host="localhost";
$userid="mysql_username";
$passwd="mysql_password";
$connectionInfo="dbi:mysql:$db;$host";
# connect to database
$dbh = DBI->connect($connectionInfo,$userid,$passwd);
# prepare and execute query
$query = "SELECT * FROM episodeguide WHERE tvshow = 'Test TV Show'";
$sth = $dbh->prepare($query);
$sth->execute();
# assign fields to variables
$sth->bind_columns(\$ID, \$tvshow, \$shownumber, \$showtitle, \$aired, \$overview);
# output result to browser
print "<b>Matches for this hardcoded query:</b><p>\n";
print "<table width=\"100\%\" border=\"1\" cellpadding=\"2\" cellspacing=\"0\"> <th>ID</th> <th>Show Name</th> <th>Episode Number</th> <th>Episode Title</th> <th>Date Aired</th> <th>Episode Overview</th>\n";
while($sth->fetch()) {
print "<tr><td>$ID</td> <td>$tvshow</td> <td>$shownumber</td> <td>$showtitle</td> <td>$aired</td> <td>$overview</td> </tr>\n";
}
print "</table>\n";
print "</body>\n";
print "</html>\n";
$sth->finish();
# disconnect from database
$dbh->disconnect;chmod 755 /var/www/cgi-bin/displaydata.plAnd test: http://192.168.1.1/cgi-bin/displaydata.pl
Sunday, April 11, 2010
Cisco, enable SSH server
This is with normal "Username/Password" authentication. Apparently IOS 15.0M and up is supporting public/private key authentication...
Router# show ip ssh
Router(config)#hostname myhostname
myhostname(config)#ip domain-name mydomain
myhostname(config)#crypto key generate rsa modulus 2048
myhostname(config)#ip ssh time-out 120
myhostname(config)# ip ssh authetication-retries 3
myhostname(config)# ip ssh port 1234
myhostname(config)#ip ssh version 2
myhostname(config)#username myusername secret mypassword
myhostname(config)#line vty 0 4
myhostname(config)# transport input ssh
myhostname(config-line)#login localSaturday, April 10, 2010
Handy GSM codes
@ = Send/OK button on your mobile phone
TO DIVERT CALLS
DIVERT ALL CALLS
CALL NOT ANSWERED
DIVERT FOR ALL CALLS
DIVERTS WHEN PHONE IS UNREACHABLE
DIVERTS WHEN PHONE IS BUSY
BARRING ALL OUTGOING CALLS
BARRING ALL CALLS
BARRING ALL OUTGOING INTERNATIONAL CALLS
BARRING ALL OUTGOING CALLS
BARRING ALL INCOMING CALLS
BARRING ALL INCOMING CALLS IF ROAMING
CALL WAITING
RINGS UNTIL ANSWERED BY YOUR VOICEMAIL
If your mobile's voicemail number is, for example:
+27-79-131-123-4567
....and you want your phone to divert to your voicemail after say 20 seconds, then type:
**61*+27791311234567**20#
The time can be up to 30 seconds (network default)
N =Ring Time (up to 30 seconds)
SEND/PREVENT YOUR PHONE NUMBER BEING SENT TO ANOTHER PHONE NUMBER
SEND/PREVENT INCOMING PHONE NUMBERS BEING SEEN ON YOUR PHONE
CHANGING PIN CODES
UNBLOCKING PHONE USING A PUK NUMBER
DISPLAY IMEI NUMBER
Reference: http://www.cellular.co.za/gsm_hash_code.htm
TO DIVERT CALLS
| ACTION | CODE |
| Deactivate call diverts | ##002#@ |
| Deactivate all conditional diverts | ##004#@ |
| Activate all conditional diverts | **004*DestinationNumber#@ |
DIVERT ALL CALLS
| Action | Hash Codes |
| Deactivate automatically divert all calls to Destination Number | ##21#@ |
| Deactivate automatically divert all calls to Destination Number | #21#@ |
| Set and Activate divert all calls to | **21*DestinationNumber#@ |
| Activate divert all calls | *21#@ |
| Status of automatically divert all calls to Destination Number | *#21#@ |
CALL NOT ANSWERED
| ACTION | CODE |
| Activate and Set call diversion when not answered | **61*DestinationNumber#@ |
| Deactivate and turn off call divert when not answered | ##61# |
| Deactivate call divert | #61#@ |
| Activate call diversion | *61#@ |
DIVERT FOR ALL CALLS
| ACTION | CODE |
| Set and Activate divert all calls to | **21*DestinationNumber#@ |
| Activate divert all calls | *21#@ |
| Deactivate divert all calls | #21#@ |
| Status of automatically divert all calls to Destination Number | *#21#@ |
DIVERTS WHEN PHONE IS UNREACHABLE
| ACTION | CODE |
| Activate call divert when not reachable | **62*DestinationNumber#@ |
| Activate call divert | *62#@ |
| Deactivate and turn off call divert if unreachable | ##62#@ |
| Deactivate call divert | #62#@ |
| Status of call divert if not reachable | *#62#@ |
DIVERTS WHEN PHONE IS BUSY
| ACTION | CODE |
| Activate call divert when busy (engaged on another call) | **67*DestinationNumber#@ |
| Activate call divert when busy | *67#@ |
| Deactivate call divert when busy | ##67#@ |
| Deactivate call divert when busy | #67#@ |
| Status of call divert when busy | *#67#@ |
BARRING ALL OUTGOING CALLS
| ACTION | CODE |
| Change password for call barring | **03*330*oldPW*newPW*newPW#@ |
| Activate barring for all outgoing calls | **33*PW#@ |
| Deactivate barring for all out going calls | #33*PW#@ |
| Status barring for all out going calls | *#33#@ |
BARRING ALL CALLS
| ACTION | CODE |
| Activate barring for all calls | **330*PW#@ |
| Deactivate barring for all calls | #330*PW#@ |
| Status baring for all calls | *#330*PW#@ |
BARRING ALL OUTGOING INTERNATIONAL CALLS
| ACTION | CODE |
| Activate barring for all outgoing international calls | **331*PW#@ |
| Deactivate barring for all outgoing international calls | #331*PW#@ |
| Status barring all outgoing international calls | *#331#@ |
BARRING ALL OUTGOING CALLS
| ACTION | CODE |
| Activate barring all outgoing calls | **333*PW#@ |
| Deactivate barring all outgoing calls | #333*PW#@ |
| Status barring all outgoing calls | *#333#@ |
BARRING ALL INCOMING CALLS
| ACTION | CODE |
| Activate barring all incoming calls | **35*PW#@ or **353*PW#@ |
| Deactivate barring all incoming calls | #35*PW#@ or **353*PW#@ |
| Status barring all incoming calls | *#35#@ or *#353#@ |
BARRING ALL INCOMING CALLS IF ROAMING
| ACTION | CODE |
| Activate barring all incoming calls if abroad | **351*PW#@ |
| Deactivate barring all incoming calls if abroad | #351*PW#@ |
| Status barring all incoming calls if abroad | *#351#@ |
CALL WAITING
| ACTION | CODE |
| Activate call waiting | *43#@ |
| Deactivate call waiting | #43##@ |
| Status call waiting | *#43#@ |
RINGS UNTIL ANSWERED BY YOUR VOICEMAIL
If your mobile's voicemail number is, for example:
+27-79-131-123-4567
....and you want your phone to divert to your voicemail after say 20 seconds, then type:
**61*+27791311234567**20#
The time can be up to 30 seconds (network default)
| ACTION | CODE |
| Set number of rings | **61*YourVoiceMailNumber**N#@ |
| Cancel previous Setting entered | ##61#@ |
SEND/PREVENT YOUR PHONE NUMBER BEING SENT TO ANOTHER PHONE NUMBER
| ACTION | CODE |
| Disable your phone number being sent | #30#DestinationNumber@ |
| Enable your phone number being sent | *30#DestinationNumner@ |
| Status of your phone number being sent | *#30# |
SEND/PREVENT INCOMING PHONE NUMBERS BEING SEEN ON YOUR PHONE
| ACTION | CODE |
| Disable incoming number being shown on your phone | *77# |
| Enable incoming number being shown on your phone | #77#@ |
| Status of whether calling parties number is shown on your phone | *#77#@ |
CHANGING PIN CODES
| ACTION | CODE |
| Change PIN 1 | **04*PINOLD*PINNEW*NEWPIN1#@ |
UNBLOCKING PHONE USING A PUK NUMBER
| ACTION | CODE |
| Unblock PIN 1 | **05*PUK*newPIN1*newPIN1#@ |
DISPLAY IMEI NUMBER
| Display IMEI Number | *#06# |
Reference: http://www.cellular.co.za/gsm_hash_code.htm
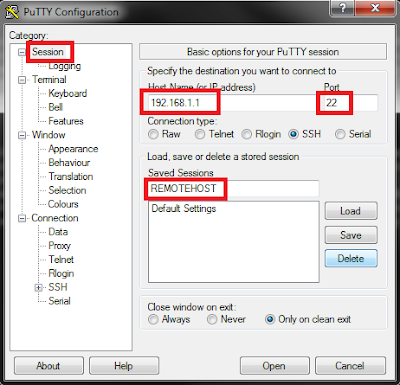
Putty, SSH, Public/Private key authentication, passwordless
Go to Start --> All Programs --> Putty --> PuTTYgen
Set type of key to generate SSH-2 RSA and number of bits in a generated key to 2048. Click the "Generate" button and move the mouse to generate your unique key.

When that's finished, Click "Save public key" to save your public key to a file, e.g. mykey.pub. Click "Save private key" and save it as e.g. mykey.pkk. SSH to your server with e.g. myuser, user account.
Go to Start --> All Programs --> Putty --> PuTTY
Set up your Session:
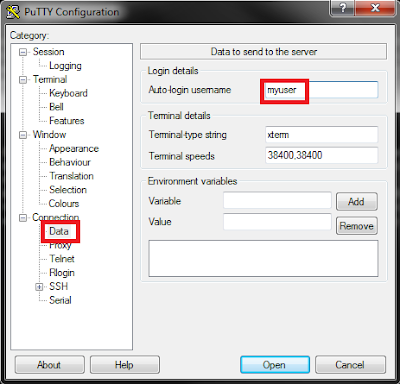
Under Connection --> Data
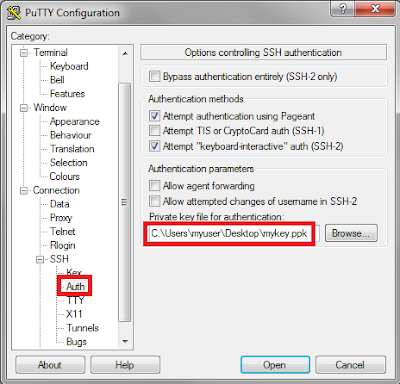
Under Connection --> SSH --> Auth
Click "Browse" and browse for the mykey.pkk file that you saved earlier.
Set type of key to generate SSH-2 RSA and number of bits in a generated key to 2048. Click the "Generate" button and move the mouse to generate your unique key.

When that's finished, Click "Save public key" to save your public key to a file, e.g. mykey.pub. Click "Save private key" and save it as e.g. mykey.pkk. SSH to your server with e.g. myuser, user account.
mkdir /home/myuser/.ssh
echo "ssh-rsa AAAAAWNzaC1KEcNZLmBl1poSrNCQ9o5rv5ts+txlu8eFvwk== rsa-key-20100410" >> /home/myuser/.ssh/authorized_keys
Go to Start --> All Programs --> Putty --> PuTTY
Set up your Session:

Under Connection --> Data

Under Connection --> SSH --> Auth
Click "Browse" and browse for the mykey.pkk file that you saved earlier.

Go back to Session and click "Save". You will now have a new session entry, REMOTEHOST, that you can double-click and PuTTY will automatically login as the myuser username to your REMOTEHOST box.
Public/Private key authentication with SSH, passwordless
On the local server, logged in as, eg. myuser:
Change to myuser's home directory.
On the remote server, you wish to log into:
Change to myuser's home directory.
mkdir /home/myuser/.ssh
cd /home/myuser/.ssh
ssh-keygen -t rsascp /home/myuser/.ssh/id_rsa.pub myuser@remote-server:/home/myuser/id_rsa.local-server.pubOn the remote server, you wish to log into:
mkdir /home/myuser/.ssh
chmod 700 /home/myuser/.ssh
cat /home/myuser/id_rsa.local-server.pub >> /home/myuser/.ssh/authorized_keys
chmod 644 /home/myuser/.ssh/authorized_keysThursday, April 8, 2010
SNMP on Cisco routers
snmp-server community mysecret ro 60
access-list 60 permit 192.168.1.1 255.255.255.0snmp-server host 192.168.1.1 mysecretDHCP server on Cisco routers
Router(config)#ip dhcp pool <any-dhcp-pool-name>
Router(dhcp-config)#network <my-network-ip> <my-network-subnetmask>
Router(dhcp-config)#dns-server <my-dns-server-ip>
Router(dhcp-config)#default-router <my-gateway-ip>
Router(dhcp-config)#domain-name <my-domain-name>
Router(dhcp-config)#lease DAYS HOURS MINUTES
Router(config)#ip dhcp excluded-address <ip-address-to-exclude-from-pool>
Router(config)#service dhcpRouter#show ip dhcp bindingRouter#show ip dhcp server statisticsRouter(config)#ip dhcp excluded-address <start-ip-to-exclude> <end-ip-to-exclude>Router(dhcp-config)#lease infiniteTuesday, April 6, 2010
Routing between VLANs, Cisco router and 3COM 4500 switch
Using a Cisco router to do the routing and a 3COM 4500 Superstack III switch for the VLANs, 802.1Q trunk setup. I'm not going to use port 1 on the switch, as this belongs to the native VLAN1. Also remember that all the other ports on the switch, not assigned to their own VLANs, will also by default belong to VLAN1. In other words, all devices plugged into any of the VLAN1 ports, will be able to see each other by default!

Setup on the Cisco router:
Setup on the 3COM 4500 Superstack III switch:

Setup on the Cisco router:
interface fa0/1
description Trunk to 3COM Switch
no ip address
no shut

interface FastEthernet0/1.13
description Finance to switch port 13
encapsulation dot1Q 13
ip address 192.168.1.1 255.255.255.0

interface FastEthernet0/1.14
description Legal to switch port 14
encapsulation dot1Q 14
ip address 192.168.2.1 255.255.255.0

interface FastEthernet0/1.15
description HR to switch port 15
encapsulation dot1Q 15
ip address 192.168.3.1 255.255.255.0

interface FastEthernet0/1.16
description QC to switch port 16
encapsulation dot1Q 16
ip address 192.168.4.1 255.255.255.0

interface FastEthernet0/1.17
description Management to switch port 17
encapsulation dot1Q 17
ip address 192.168.5.1 255.255.255.0Setup on the 3COM 4500 Superstack III switch:
Select menu option (bridge/vlan): create
Select VLAN ID (2-4094)[3]: 2
Enter VLAN Name [VLAN 2]: Trunk

Select menu option (bridge/vlan): create
Select VLAN ID (2-4094)[3]: 13
Enter VLAN Name [VLAN 13]: Finance

Select menu option (bridge/vlan): create
Select VLAN ID (2-4094)[3]: 14
Enter VLAN Name [VLAN 14]: Legal

Select menu option (bridge/vlan): create
Select VLAN ID (2-4094)[3]: 15
Enter VLAN Name [VLAN 15]: HR

Select menu option (bridge/vlan): create
Select VLAN ID (2-4094)[3]: 16
Enter VLAN Name [VLAN 16]: QC

Select menu option (bridge/vlan): create
Select VLAN ID (2-4094)[3]: 17
Enter VLAN Name [VLAN 17]: Management

Select menu option (bridge/vlan/modify): add
Select VLAN ID (1-2,116,120)[1]: 13
Select bridge ports (AL1-AL4,unit:port...,?): 1:13
Enter tag type (untagged, tagged): untagged

Select menu option (bridge/vlan/modify): add
Select VLAN ID (1-2,116,120)[1]: 14
Select bridge ports (AL1-AL4,unit:port...,?): 1:14
Enter tag type (untagged, tagged): untagged

Select menu option (bridge/vlan/modify): add
Select VLAN ID (1-2,116,120)[1]: 15
Select bridge ports (AL1-AL4,unit:port...,?): 1:15
Enter tag type (untagged, tagged): untagged

Select menu option (bridge/vlan/modify): add
Select VLAN ID (1-2,116,120)[1]: 16
Select bridge ports (AL1-AL4,unit:port...,?): 1:16
Enter tag type (untagged, tagged): untagged

Select menu option (bridge/vlan/modify): add
Select VLAN ID (1-2,116,120)[1]: 17
Select bridge ports (AL1-AL4,unit:port...,?): 1:17
Enter tag type (untagged, tagged): untagged

Select menu option (bridge/vlan/modify): add
Select VLAN ID (1-2,116,120)[1]: 13-17
Select bridge ports (AL1-AL4,unit:port...,?): 1:2
Enter tag type (untagged, tagged): taggedMonday, April 5, 2010
Ubuntu, LAMP, SSL, CGI and password protection
I'll setup a minimal install of Ubuntu 9.10, Apache webserver, MySQL database and make it PHP compatible. I'll be using a self signed SSL certificate, create a Virtual Host and password protect the space. I'll also make the Virual Host ready to run CGI scripts.
1. Install LAMP environment:
Login as "root"
change memory_limit = 16M to memory_limit = 32M
From another PC type http://yourserverip/info.php in your browser and you should see some nice info about your PHP installation. After we've seen this page, we know PHP works and "info.php" can be removed:
#NameVirtualHost *:80
#Listen 80
2. Configure a SSL and CGI ready Virtual Host:
Change ServerAdmin webmaster@localhost to ServerAdmin youremail@address
Add ServerName www.mydomain.com:443 under ServerAdmin line
Change DocumentRoot /var/www to DocumentRoot /var/www/www.mydomain.com/public_html
Change AllowOverride None to AllowOverride AuthConfig
Change <Directory /var/www/> to <Directory /var/www/www.mydomain.com/>
Change AllowOverride None to AllowOverride AuthConfig
Change ScriptAlias to ScriptAlias /cgi-bin/ /var/www/www.mydomain.com/cgi-bin/
Change <Directory "/usr/lib/cgi-bin"> to <Directory "/var/www/www.mydomain.com/cgi-bin">
Change ErrorLog /var/www/www.mydomain.com/logs/error.log
Change CustomLog to CustomLog /var/www/www.mydomain.com/logs/ssl_access.log combined
Change, under </FilesMatch>, <Directory /usr/lib/cgi-bin> to <Directory /var/www/www.mydomain.com/cgi-bin>
3. Create my own self-signed certificate:
The following will create a self-signed certificate and private key file in one file:
SSLCertificateFile /etc/ssl/certs/ssl-cert-snakeoil.pem
to
SSLCertificateFile /etc/ssl/certs/www.mydomain.com.pem
and
SSLCertificateKeyFile /etc/ssl/private/ssl-cert-snakeoil.key
to
SSLCertificateKeyFile /etc/ssl/private/www.mydomain.com.key
4. Password protect the Virtual host:
NOTE: To add more usernames and passwords to the same file you must:
htpasswd -s .htpasswd anotherusername
The .htaccess file must exist in the directory that you want to protect:
AuthUserFile /var/www/www.mydomain.com/.htpasswd
AuthType Basic
AuthName "Enter Login Details"
Require valid-user
1. Install LAMP environment:
Login as "root"
apt-get update

apt-get install mysql-server mysql-client apache2 ssl-cert php5 libapache2-mod-php5 php5-mysql php5-mcrypt php5-memcache php5-snmp php5-xmlrpc php5-xsl php5-suhosin apache2-suexec libapache2-mod-ruby libapache2-mod-perl2 libapache2-mod-python python-mysqldbecho "ServerName localhost" | sudo tee /etc/apache2/conf.d/fqdn
echo "<?php phpinfo(); ?>" > /var/www/info.php
nano /etc/php5/apache2/php.inichange memory_limit = 16M to memory_limit = 32M
/etc/init.d/apache2 restartFrom another PC type http://yourserverip/info.php in your browser and you should see some nice info about your PHP installation. After we've seen this page, we know PHP works and "info.php" can be removed:
rm -rf /var/www/info.phpnano /etc/apache2/ports.conf#NameVirtualHost *:80
#Listen 80
2. Configure a SSL and CGI ready Virtual Host:
a2enmod ssl

/etc/init.d/apache2 restart

mkdir -p /var/www/www.mydomain.com/public_html
mkdir /var/www/www.mydomain.com/cgi-bin
mkdir /var/www/www.mydomain.com/logs
cp /etc/apache2/sites-available/default-ssl /etc/apache2/sites-available/www.mydomain.com
nano /etc/apache2/sites-available/www.mydomain.com
Change ServerAdmin webmaster@localhost to ServerAdmin youremail@address
Add ServerName www.mydomain.com:443 under ServerAdmin line
Change DocumentRoot /var/www to DocumentRoot /var/www/www.mydomain.com/public_html
Change AllowOverride None to AllowOverride AuthConfig
Change <Directory /var/www/> to <Directory /var/www/www.mydomain.com/>
Change AllowOverride None to AllowOverride AuthConfig
Change ScriptAlias to ScriptAlias /cgi-bin/ /var/www/www.mydomain.com/cgi-bin/
Change <Directory "/usr/lib/cgi-bin"> to <Directory "/var/www/www.mydomain.com/cgi-bin">
Change ErrorLog /var/www/www.mydomain.com/logs/error.log
Change CustomLog to CustomLog /var/www/www.mydomain.com/logs/ssl_access.log combined
Change, under </FilesMatch>, <Directory /usr/lib/cgi-bin> to <Directory /var/www/www.mydomain.com/cgi-bin>
a2dissite default-ssl
a2ensite www.mydomain.com
/etc/init.d/apache2 restart
3. Create my own self-signed certificate:
The following will create a self-signed certificate and private key file in one file:
make-ssl-cert /usr/share/ssl-cert/ssleay.cnf /etc/ssl/private/www.mydomain.com.crt

cat /etc/ssl/private/www.mydomain.com.crtnano /etc/ssl/private/www.mydomain.com.keynano /etc/ssl/certs/www.mydomain.com.pemrm -f /etc/ssl/private/www.mydomain.com.crt
nano /etc/apache2/sites-available/www.mydomain.comSSLCertificateFile /etc/ssl/certs/ssl-cert-snakeoil.pem
to
SSLCertificateFile /etc/ssl/certs/www.mydomain.com.pem
and
SSLCertificateKeyFile /etc/ssl/private/ssl-cert-snakeoil.key
to
SSLCertificateKeyFile /etc/ssl/private/www.mydomain.com.key
/etc/init.d/apache2 restart

> /var/www/index.html4. Password protect the Virtual host:
cd /var/www/www.mydomain.comhtpasswd -c -s .htpasswd yourusernameNOTE: To add more usernames and passwords to the same file you must:
htpasswd -s .htpasswd anotherusername
The .htaccess file must exist in the directory that you want to protect:
nano /var/www/www.mydomain.com/public_html/.htaccessAuthUserFile /var/www/www.mydomain.com/.htpasswd
AuthType Basic
AuthName "Enter Login Details"
Require valid-user
/etc/init.d/apache2 restartSunday, April 4, 2010
Ubuntu, Trusted SSL Certificate install in Apache
Generating the Private Key file:
Your new CSR file will be located here:
Open your new certificate you just received and copy the part beginning with -----BEGIN CERTIFICATE----- and ending with -----END CERTIFICATE-----
Copy the chain file, given by your CA, to for example your /etc/ssl/certs/ directory on your server. Let's assume the chain filename is CAchainFile.pem
SSLCertificateChainFile /etc/ssl/certs/CAchainFile.pem
Apache needs to be restarted after this change:
http://cert.startcom.org
http://www.cacert.org
su root
apt-get update
apt-get install ssl-cert
make-ssl-cert /usr/share/ssl-cert/ssleay.cnf /etc/ssl/private/www.mydomainname.com.crtcat /etc/ssl/private/www.mydomainname.com.crtnano /etc/ssl/private/www.mydomainname.com.keyrm -f /etc/ssl/private/www.mydomainname.com.crt
mkdir /etc/ssl/csr
openssl req -new -key /etc/ssl/private/www.mydomainname.com.key -out /etc/ssl/csr/www.mydomainname.com.csrYour new CSR file will be located here:
cat /etc/ssl/csr/www.mydomainname.com.csrOpen your new certificate you just received and copy the part beginning with -----BEGIN CERTIFICATE----- and ending with -----END CERTIFICATE-----
nano /etc/ssl/certs/www.mydomainname.com.pem/etc/init.d/apache2 restartCopy the chain file, given by your CA, to for example your /etc/ssl/certs/ directory on your server. Let's assume the chain filename is CAchainFile.pem
nano /etc/apache2/sites-available/www.mydomainname.com-sslSSLCertificateChainFile /etc/ssl/certs/CAchainFile.pem
Apache needs to be restarted after this change:
/etc/init.d/apache2 restarthttp://cert.startcom.org
http://www.cacert.org
Friday, April 2, 2010
Ubuntu "Live / Install CD" from existing system
A. Prepare the environment:
1. Set the variables:
B. Copy existing installation into the new filesystem:
C. Chroot into the new system and modify it:
1. Chroot into the copied system after mounting proc and dev:
3. (Optional) If you want your live cd to have an installer, install the Ubuntu installer:
5. Update the modules.dep and initramfs:
6. Remove non system users: (script)
7. Delete these files: (script)
8. Cleanup the chroot environment:
10. Create needed log files in /var/log: (script)
D. Prepare The CD directory tree:
1. Copy the kernel, the updated initrd and memtest prepared in the chroot:
Note: This step is only needed if you installed the Ubuntu installer ubiquity. This step generates two files (filesystem.manifest & filesystem.manifest-desktop).
3. Unmount bind mounted dirs:
5. Make Grub the bootloader for the CD
Copy grub file:
E. Build the CD/DVD
1. Make the ISO file:
1. Set the variables:
export WORK=~/work
export CD=~/cd
export FORMAT=squashfs
export FS_DIR=caspersudo mkdir -p ${CD}/{${FS_DIR},boot/grub} ${WORK}/rootfssudo apt-get update
sudo apt-get install mkisofs grub squashfs-tools linux-headers-$(uname -r)B. Copy existing installation into the new filesystem:
sudo rsync -av --one-file-system --exclude=/proc/* --exclude=/dev/*\ --exclude=/sys/* --exclude=/tmp/* --exclude=/home/*\ --exclude=/lost+found / ${WORK}/rootfssudo cp -av /boot/* ${WORK}/rootfs/bootcp -r /home/yourusername/.config /home/yourusername/.xscreensaver /root/work/rootfs/etc/skel/C. Chroot into the new system and modify it:
1. Chroot into the copied system after mounting proc and dev:
sudo mount -o bind /dev/ ${WORK}/rootfs/dev
sudo mount -t proc proc ${WORK}/rootfs/proc
sudo chroot ${WORK}/rootfs /bin/bashLANG=
apt-get update
apt-get install casper discover1 xresprobe3. (Optional) If you want your live cd to have an installer, install the Ubuntu installer:
apt-get install ubiquity5. Update the modules.dep and initramfs:
depmod -a $(uname -r)
update-initramfs -u -k $(uname -r)6. Remove non system users: (script)
for i in `cat /etc/passwd | awk -F":" '{print $1}'`
do
        uid=`cat /etc/passwd | grep "^${i}:" | awk -F":" '{print $3}'`
        [ "$uid" -gt "999" -a  "$uid" -ne "65534"  ] && userdel --force ${i} 2>/dev/null
done7. Delete these files: (script)
for i in "/etc/hosts /etc/hostname /etc/resolv.conf /etc/timezone /etc/fstab /etc/mtab /etc/shadow /etc/shadow- /etc/gshadow  /etc/gshadow- /etc/gdm/gdm-cdd.conf /etc/X11/xorg.conf /boot/grub/menu.lst /boot/grub/device.map"
do
        rm $i
done 2>/dev/null8. Cleanup the chroot environment:
apt-get clean
find /var/run /var/log /var/mail /var/spool /var/lock /var/backups /var/tmp -type f -exec rm {} \;
rm -r /boot/*.bak /tmp/* /home/* /root/* 2>/dev/null[ -f "/etc/gdm/factory-gdm.conf" ] && cp -f /etc/gdm/factory-gdm.conf /etc/gdm/gdm.conf 2>/dev/null10. Create needed log files in /var/log: (script)
for i in dpkg.log lastlog mail.log syslog auth.log daemon.log faillog lpr.log mail.warn user.log boot debug mail.err messages wtmp bootstrap.log dmesg kern.log mail.info
do
        touch /var/log/${i}
donerm /usr/lib/ubiquity/apt-setup/generators/50cdromrm /usr/share/applications/ubiquity-gtkui.desktopexitD. Prepare The CD directory tree:
1. Copy the kernel, the updated initrd and memtest prepared in the chroot:
sudo cp -vp ${WORK}/rootfs/boot/vmlinuz-$(uname -r) ${CD}/boot/vmlinuz
sudo cp -vp ${WORK}/rootfs/boot/initrd.img-$(uname -r) ${CD}/boot/initrd.gz
sudo cp -vp ${WORK}/rootfs/boot/memtest86+.bin ${CD}/bootNote: This step is only needed if you installed the Ubuntu installer ubiquity. This step generates two files (filesystem.manifest & filesystem.manifest-desktop).
sudo chroot ${WORK}/rootfs dpkg-query -W --showformat='${Package} ${Version}\n' | sudo tee ${CD}/${FS_DIR}/filesystem.manifest
sudo cp -v ${CD}/${FS_DIR}/filesystem.manifest{,-desktop}
REMOVE='ubiquity casper user-setup discover1 xresprobe os-prober libdebian-installer4'for i in $REMOVE
do
sudo sed -i "/${i}/d" ${CD}/${FS_DIR}/filesystem.manifest-desktop
done3. Unmount bind mounted dirs:
sudo umount ${WORK}/rootfs/dev ${WORK}/rootfs/procsudo mksquashfs ${WORK}/rootfs ${CD}/${FS_DIR}/filesystem.${FORMAT}5. Make Grub the bootloader for the CD
Copy grub file:
sudo find /boot /usr/lib/grub/ -iname 'stage2_eltorito' -exec cp -v {} ${CD}/boot/grub \;sudo nano ${CD}/boot/grub/menu.lst# By default, boot the first entry.
default 0
# Boot automatically after 30 secs.
timeout 30
title System (Graphical Mode)
kernel /boot/vmlinuz BOOT=casper boot=casper nopersistent rw quiet splash
initrd /boot/initrd.gz
title System (Safe Graphical Mode)
kernel /boot/vmlinuz BOOT=casper boot=casper xforcevesa rw quiet splash
initrd /boot/initrd.gz
title Linux (Text Mode CLI)
kernel /boot/vmlinuz BOOT=casper boot=casper nopersistent textonly rw quiet
initrd /boot/initrd.gz
title Memory Test
kernel /boot/memtest86+.bin
title Boot the First Hard Disk
root (hd0)
chainloader +1cd $CD && find . -type f -print0 | xargs -0 sudo md5sum | sudo tee ${CD}/md5sum.txtE. Build the CD/DVD
1. Make the ISO file:
sudo mkisofs -b boot/grub/stage2_eltorito -no-emul-boot -boot-load-size 4 -boot-info-table -V "MY_LIVE_CD" -cache-inodes -r -J -l -o ~/my-live-install-cd.iso $CD
Subscribe to:
Comments (Atom)